Why is my dryer making loud noises?
A dryer making loud noises is usually caused by worn drum rollers, a failing idler pulley, or objects scraping inside the drum seam. The fastest way to diagnose it is to match the sound to the part, then confirm with a simple spin test. Use the sound guide + step-by-step checks below to pinpoint the real culprit.
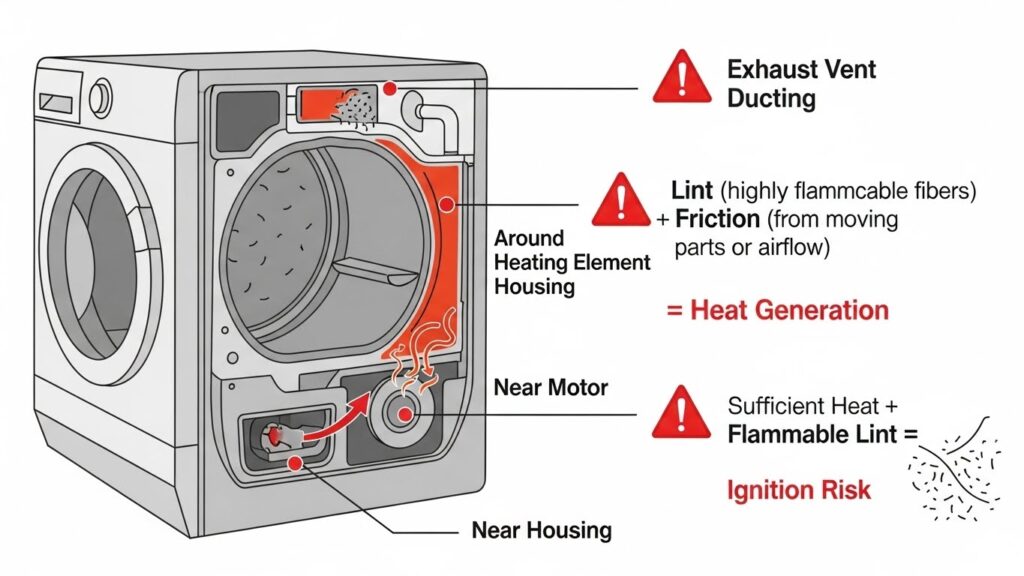
Safety First: Always unplug the dryer (or turn off power at the breaker) before inspection. Do not run the dryer with panels removed. If you smell burning or see smoke, stop using the dryer until the cause is found. Metal-on-metal friction can generate heat and can ignite lint in the cabinet. (This is why noise isn’t “just annoying.”)
Tools Needed
| Tool | Why it helps |
|---|---|
| Screwdriver / nut driver set | Access panels (model-dependent) |
| Flashlight | See rollers, glides, seals, and the blower area |
| Vacuum + crevice tool | Remove lint and debris (reduces friction + fire risk) |
| Work gloves | Cabinet edges and brackets can be sharp |
How Dryer Noise Usually Starts (and Why It Gets Worse)
Last updated: January 6, 2026
Dryer noise almost never appears out of nowhere. It usually begins as a faint squeak, then turns into thumping or grinding as the drum keeps rotating on worn supports. In real service workflows, the quickest path is sound → likely part → confirm with a simple test. For example, Whirlpool’s own support notes that scraping often comes from small objects caught at the drum seam.
Quick sound clues (listen for the “pattern”):
- High-pitched squeal / chirp: idler pulley or drum rollers (dry bearing or wear)
- Rhythmic thump (“heartbeat”): flat-spotted roller or load-related drum imbalance
- Scraping / metal rub: objects in drum seam, worn glides, or felt/seal contact
- Knocking / rattling: loose items, cabinet vibration, or blower area debris
Table of Contents
- 1) Sound Decoder: Match the Noise to the Part
- 2) The 60-Second Manual Spin Test (No Tools)
- 3) Step-by-Step Noise Inspection (Safe Order)
- 4) Parts That Most Often Need Replacement (and the “kit strategy”)
- 5) Prevention: Keep Noise from Coming Back
- 6) FAQ
- 7) Important Safety & Information Notice
- 8) References
1) Sound Decoder: Match the Noise to the Part
Before you remove anything, identify the sound type and when it happens (startup, steady running, only with heavy loads, only when hot). This table narrows it down fast.
| Sound | Most likely cause | Fast confirmation | DIY risk |
|---|---|---|---|
| Scraping | Small objects caught at drum seam; drum rubbing front/rear | Inspect front/rear drum edges for coins/screws; remove debris | Low–Medium |
| Knocking / rattling | Loose items, cabinet vibration, blower wheel area debris | Check drum + lint duct area; confirm nothing is loose | Low–Medium |
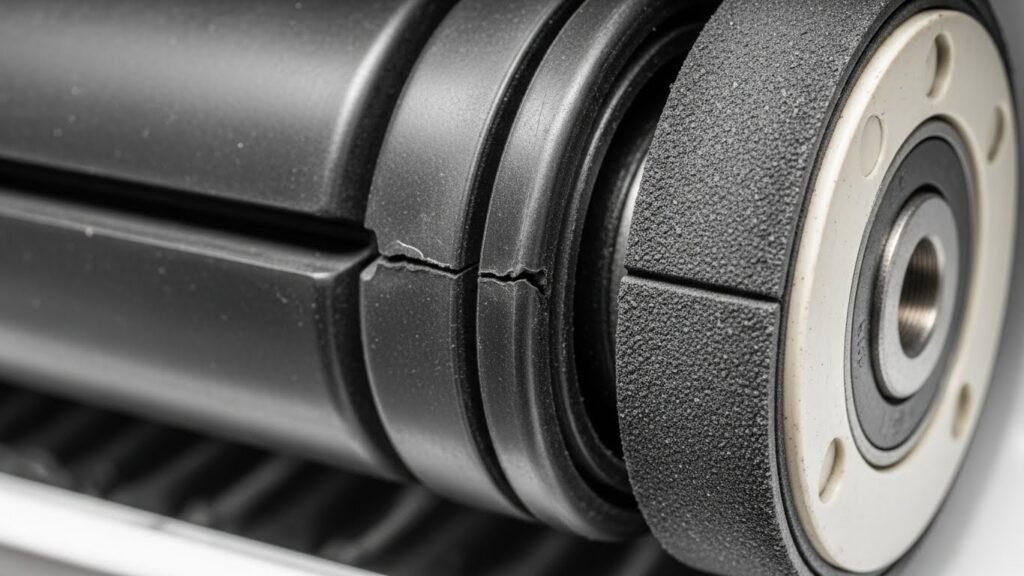
| Squealing / squeaking | Worn roller or idler pulley bearing | Hand-spin rollers/pulley: roughness, wobble, sticking = bad | Medium |
| Thumping | Flat-spotted roller or overloaded/uneven load | Empty run test; if thump remains, suspect rollers/supports | Medium |
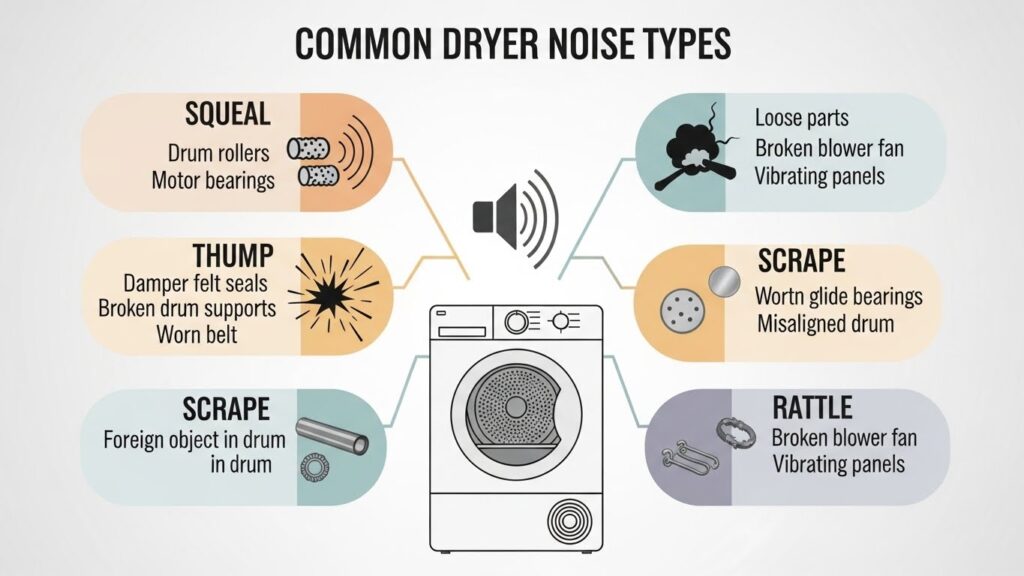
Small but important: If the noise is scraping, check for objects caught at the drum seam first—this is a known, common cause in official support guidance.
2) The 60-Second Manual Spin Test (No Tools)
This is the “cheap truth” test. It tells you whether you’re dealing with a mechanical drag problem or a loose-object/vibration problem.
- Power off: Unplug the dryer (or breaker OFF).
- Open the door: Place one hand on the drum and rotate it slowly.
- Listen + feel:
- Bumpy / periodic resistance: likely a roller flat spot (thumping later).
- High-pitched squeak while hand-spinning: roller or idler bearing dryness/wear.
- Scratchy rub near the edges: object in seam or worn glide/seal contact.
Stop point: If the drum feels like it’s binding hard, or you suspect the drum must be fully removed to inspect bearings/glides, it’s often safer (and faster) to use a qualified technician—dryers have heavy parts and sharp cabinet edges.
3) Step-by-Step Noise Inspection (Safe Order)
Step 1 — Rule out “easy rattles” first
Check pockets, the lint screen area, and the drum for coins, screws, or hairpins. If the sound is scraping, look closely at the front and rear edges where the drum meets the cabinet—small hardware can catch in that seam.
Step 2 — Empty run test (2 minutes)
If you can safely do so with the unit fully assembled, run the dryer empty for 1–2 minutes. No noise when empty often points to load balance/overloading. Noise still present is more likely rollers, idler, glides, blower wheel, or cabinet vibration.
Step 3 — Inspect the drum support system
Once power is disconnected and you can access the drum support area (model-dependent), hand-spin rollers and the idler pulley. You’re looking for roughness, wobble, or “gritty” rotation. A squeaky dryer is commonly linked to these wear points, and Whirlpool’s guidance focuses on addressing the underlying worn components rather than masking the noise.
Step 4 — Check vent airflow (because noise and heat problems often share a root cause)
This one surprises people: restricted airflow increases heat inside the cabinet, which can worsen friction issues and also raises fire risk. Fire-safety agencies emphasize dryer fire prevention, and lint management is a core theme.
Do not do this: Spraying WD-40 or flammable solvents into a dryer is a bad idea. If the noise is from a sealed bearing, it won’t “heal” with spray—usually it just attracts lint and turns into grinding later.
4) Parts That Most Often Need Replacement (and the “kit strategy”)
In real repairs, replacing only one worn piece often means you’ll be opening the dryer again soon. If one roller is worn, the others have similar “mileage.” That’s why many techs use a maintenance kit approach:
Maintenance kit strategy (saves repeat disassembly):
- Drum rollers (set)
- Idler pulley (or idler assembly)
- Drive belt (if accessible during the same teardown)
If your noise is squealing or rhythmic thumping, this bundle is often the most efficient long-term fix.
If the sound is scraping, replace parts only after you confirm the cause. Sometimes it’s simply hardware caught at the drum seam—remove it and you’re done.
5) Prevention: Keep Noise from Coming Back
- Don’t overload: heavy loads accelerate roller flat spots and drum stress.
- Don’t leave wet, heavy loads sitting in the drum: it can contribute to uneven pressure on rollers (future thump).
- Clean lint consistently: lint is not just “mess”—it’s fuel, and airflow matters for safety. :contentReference[oaicite:7]{index=7}
- Keep vent runs short and smooth: less backpressure, better drying, less heat buildup.
- Fix small noises early: the cheapest repair is the one you don’t let escalate.
6) FAQ
Is it safe to keep using a noisy dryer?
Mild noise might run for a while, but if the sound is getting louder, scraping metal, or you notice any burning smell, stop using it until you identify the cause. Friction and lint together are a real safety concern.
My dryer squeals for the first minute, then quiets down. What does that mean?
That pattern often points to a roller or idler pulley bearing that’s drying out—cold start is loud, then it “warms into place.” It usually doesn’t get better over time; it trends toward failure.
What if the noise is scraping—like metal rubbing?
Start by checking for objects caught at the drum seam (coins, pins, screws) and remove them. This is a documented cause in manufacturer support guidance.
Can a noisy dryer cost more to run?
Yes. Mechanical friction can make the motor work harder, and vent restriction can increase dry time. Even if your bill doesn’t spike immediately, the wear cost shows up later as bigger repairs.
Should I lubricate rollers or the idler pulley?
Most modern rollers use sealed bearings. If the bearing is worn, lubrication typically won’t fix it long-term. Focus on replacing worn components instead of masking the sound.
Related Guides on HomeFix Atlas
- Dryer Not Heating: Heating Element, Fuse, and Vent Cleaning
- Dryer Not Heating — Heating Element, Thermal Fuse, and Vent Checks (Scheduled)
- Washer Not Draining – Complete Troubleshooting Guide
7) Important Safety & Information Notice
This article is provided for general informational purposes only. Appliance repair involves electrical shock hazards, sharp metal edges, heavy components, and fire risk. If you are not confident performing these checks safely, consult a qualified appliance technician and follow your manufacturer’s service guidance.
8) References
- Whirlpool Product Help — Scraping Sound (Dryer)
- Whirlpool Product Help — Thumping Sound (Dryer)
- Whirlpool — How to Fix a Squeaky Dryer
- NFPA Research — Fires Involving Clothes Dryers and Washing Machines
Professional Disclaimer: This guide is for educational purposes only. Appliance repair involves risks including electrical shock, physical injury, and fire hazards. If you are uncertain about disassembly steps or diagnosis, consult a licensed technician.

I publish step-by-step troubleshooting guides for common home appliance issues (washer, dryer, refrigerator, HVAC basics).
Content is written for everyday homeowners and cross-checked with manufacturer manuals, safety guidance, and trusted public resources.
Posts include practical checks, clear stop-signs for safety, and guidance on when it’s better to call a qualified technician. Updates are logged whenever steps or recommendations change.
Safety note: If you smell gas, see burning, or suspect electrical hazards—stop immediately and contact a qualified professional.