Why is my dryer running but not heating?
If your dryer tumbles but won’t heat, the most common causes are restricted airflow (clogged vent), a blown thermal fuse, or a failed heater/ignition part (heating element on electric; igniter/valve coils on gas). Start with the fastest real-world win: airflow + breaker reset, then test safety cutoffs. The exact safe order is laid out step by step below.
Last updated: January 5, 2026
Safety First: Unplug the dryer or shut off power at the breaker before opening any panel. Electric dryers use 240V circuits. Gas dryers involve combustion components. If you smell gas (sulfur / “rotten eggs”), stop, ventilate, leave the area, and contact your gas provider or a qualified technician. Do not bypass safety devices (thermal fuse, thermostats).
Quick Standards (No-Heat Diagnosis That Actually Works)
- Airflow first: weak vent airflow can shut heat off even if parts are fine.
- The 240V trap: electric dryers can tumble on 120V but need full 240V to heat.
- Fuse is a “why” clue: a blown thermal fuse often points back to a clogged vent.
- Stop point: if you’re unsure with a multimeter, don’t guess—call a pro.
Tools Needed
| Item | Purpose |
|---|---|
| Multimeter | Testing continuity/resistance of fuse, thermostats, element, igniter |
| Vent brush + vacuum | Removing lint from the airflow path (most common root cause) |
| Screwdriver / nut driver | Accessing rear or front service panels (model-dependent) |
| Owner’s manual | Confirming component locations + safe service access for your model |
How “No Heat” Dryer Problems Show Up
A dryer running but not heating is confusing because it feels “half broken.” The drum turns, the timer advances, but clothes come out damp. In many models, heat is intentionally disabled when the dryer senses unsafe conditions (overheating risk from poor airflow).
Quick symptom triage
- Tumbles, absolutely no heat: thermal fuse, heater circuit, or ignition parts.
- Heats briefly then goes cold: airflow restriction or high-limit thermostat cycling.
- Runs “forever” but still damp: vent restriction / crushed duct / lint buildup.
Table of Contents
- 1) Most common causes (electric vs gas)
- 2) Step-by-step diagnosis (safe order)
- 3) Vent airflow test (the hidden cause)
- 4) Multimeter checks + typical readings
- 5) When to stop DIY and call a technician
- 6) FAQ
- 7) How this guide was prepared
- 8) Important safety notice
- 9) References
- Related guides on this site
1) Most Common Causes (Electric vs Gas)
Electric dryers (most common failures)
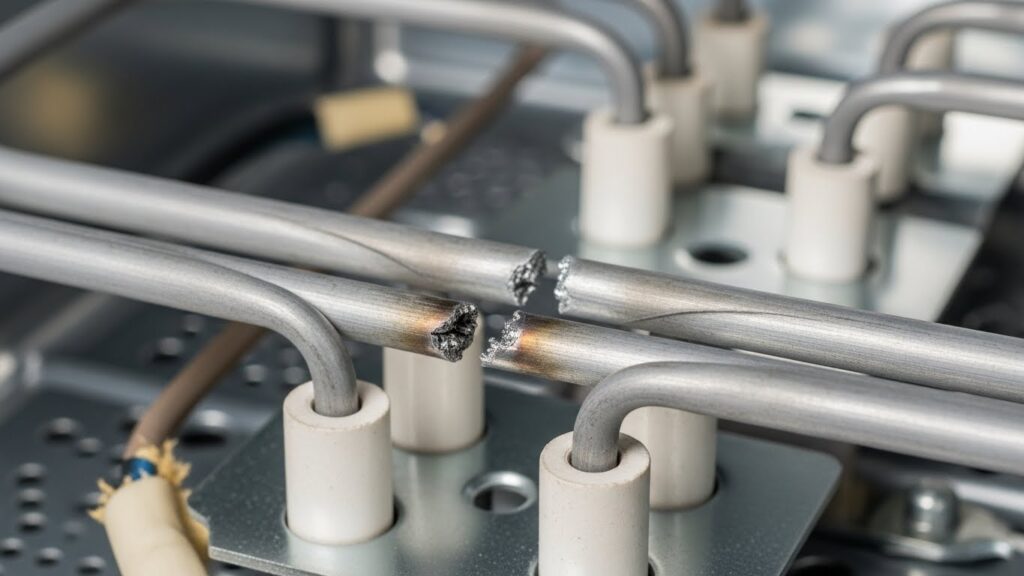
- Heating element failed: coil breaks → no heat output.
- Thermal fuse blown: safety cutoff (often triggered by restricted airflow).
- Partial power / breaker issue: motor runs, but heater doesn’t get full 240V.
- High-limit thermostat cycling: heat shuts off when cabinet gets too hot.
Gas dryers (most common failures)
- Igniter failure: igniter doesn’t glow or can’t ignite gas.
- Gas valve coils (solenoids) failing: igniter glows, but no flame or flame drops after minutes.
- Flame sensor issue: burner won’t stay lit.
- Airflow restriction: still matters—overheat protection can stop heat.
2) Step-by-Step Diagnosis (Safe Order)
Don’t start by buying parts. Use this order because it catches the “invisible” problems first. Most people skip Steps 1–2, replace a fuse, and it blows again.
Step 0 — Confirm you’re not on an “Air Fluff / No Heat” cycle
It sounds too basic, but it happens. Make sure the cycle is a heated setting and the temperature isn’t set to “No Heat.”
Step 1 — The breaker reset (electric dryers: the 240V circuit trap)
Electric dryers typically use a double-pole breaker. One side can trip while the other stays on— the dryer will still tumble, but won’t heat. Flip the dryer breaker fully OFF, then back ON.
Step 2 — Airflow check (fastest real-world win)
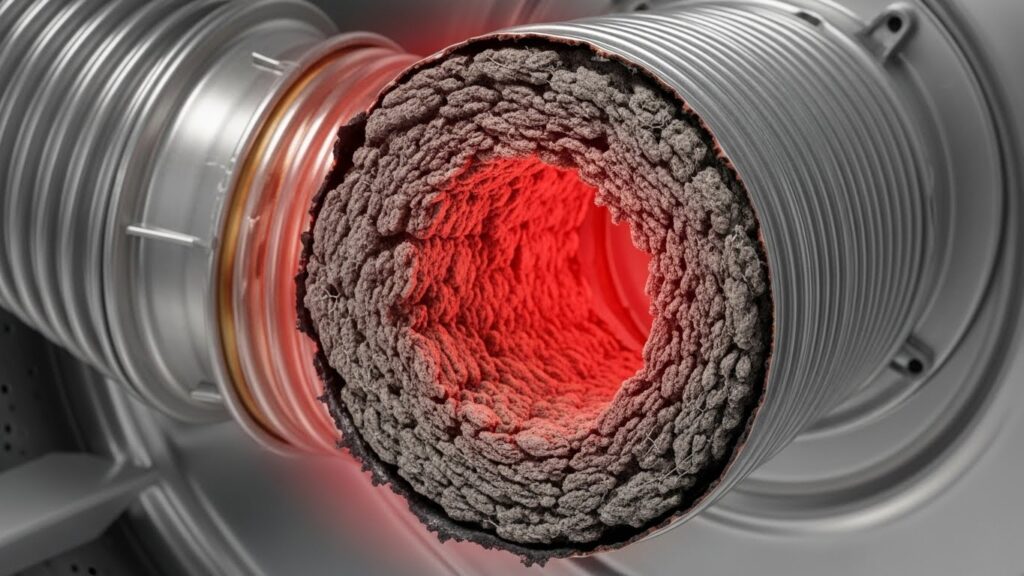
Start the dryer and go to the outdoor vent hood. You want strong, steady airflow. Weak airflow is a top cause of “runs but no heat” because the dryer overheats internally and disables heating for safety.
Step 3 — Clean the lint screen + inspect the vent hose behind the dryer
Clean the lint screen thoroughly. Then inspect the vent hose: crushed flex ducts, heavy lint mats, or long, twisty runs reduce airflow dramatically. (If your local code discourages foil/plastic vents, switch to approved metal ducting.)
Step 4 — If it’s gas: confirm gas supply basics (no disassembly)
If other gas appliances are working, supply is likely okay—but the dryer can still have ignition/coil issues. If you smell gas, stop and call for service. Do not “test” by repeatedly cycling the dryer.
Step 5 — If airflow and power check out, test the thermal fuse (continuity)
With the dryer unplugged, test the thermal fuse for continuity. A blown fuse must be replaced, but treat it as a message: fix airflow first or it can blow again.
Stop point: If the next step requires removing multiple panels, handling sharp cabinet edges, or reaching wiring harnesses you don’t recognize, it’s safer to use a qualified appliance technician.
3) Dryer Vent & Airflow Checks (The Hidden Cause)
Airflow problems don’t just “make drying slow.” They can trigger safety cutoffs that kill heat. Use this quick logic:
Airflow logic: If the dryer heats normally only when the vent hose is removed or straightened, your house vent line is restricted and needs cleaning. Don’t run long-term disconnected (lint + moisture problems). Use it only as a brief confirmation and then fix the vent properly.
- Keep vent runs short and straight whenever possible.
- Clean the entire vent line regularly (pets + heavy laundry = faster buildup).
- Make sure the outdoor hood flap opens freely (it can stick shut).
4) Multimeter Checks + Typical Readings (General Guidance)
Model-to-model values vary, so use these as typical ranges, not a guarantee. The key concept is simple: no continuity (OL / infinity) usually means the part is failed.
| Component | What you’re checking | Typical result |
|---|---|---|
| Thermal fuse | Continuity (safety cutoff) | Should read near 0 Ω (closed circuit) |
| Heating element (electric) | Resistance / continuity | Often ~10–50 Ω depending on model |
| Igniter (gas) | Resistance (and visual glow during operation, if safely observable) | Often ~40–400 Ω depending on igniter type |
| Thermostats / sensors | Continuity at room temperature (varies) | Many show continuity when cool; consult your manual |
5) When to Stop DIY and Call a Technician
- You smell gas, see scorch marks, or notice repeated overheating.
- Your multimeter readings are confusing or inconsistent.
- Replacing a thermal fuse didn’t help (or it blew again) after airflow was corrected.
- The repair requires extensive disassembly, wiring diagnosis, or gas component handling.
6) FAQ
My dryer runs but there’s no heat at all—what should I check first?
Start with airflow (lint screen + outdoor vent test), then do the breaker reset (electric), then test the thermal fuse. This order prevents repeat failures.
Can a clogged vent really stop heat completely?
Yes. Restricted airflow can cause overheating, which triggers safety devices that shut heat down to reduce fire risk.
Does a blown thermal fuse mean something else is wrong?
Often, yes. A fuse can blow after overheating—commonly caused by a clogged vent, crushed duct, or heavy lint buildup inside the airflow path.
Gas dryer: igniter glows but no flame starts—what does that suggest?
A common scenario is failing gas valve coils (solenoids) or a flame-sensing issue. Because this involves combustion components, many users choose professional service at this step.
7) How This Guide Was Prepared
The diagnostic sequence here follows common manufacturer-style troubleshooting flow: airflow and power checks first, then safety cutoffs, then heating/ignition components. The goal is to avoid unnecessary part replacement and reduce repeat failures caused by hidden vent restrictions.
8) Important Safety & Information Notice
This article is provided for general informational purposes only. Dryer troubleshooting involves high voltage, sharp metal edges, and (for gas models) combustion hazards. If you are not comfortable performing these steps, contact a qualified appliance technician and follow your manufacturer’s manual.
9) References
- U.S. CPSC — Overheated Clothes Dryers Can Cause Fires
- Whirlpool — Dryer Not Heating (Troubleshooting)
- Maytag — Why Is My Dryer Not Heating?
- NFPA — Home Fire Prevention & Safety (Laundry area safety basics)
Related Guides on This Site

I publish step-by-step troubleshooting guides for common home appliance issues (washer, dryer, refrigerator, HVAC basics).
Content is written for everyday homeowners and cross-checked with manufacturer manuals, safety guidance, and trusted public resources.
Posts include practical checks, clear stop-signs for safety, and guidance on when it’s better to call a qualified technician. Updates are logged whenever steps or recommendations change.
Safety note: If you smell gas, see burning, or suspect electrical hazards—stop immediately and contact a qualified professional.