Refrigerator warm but freezer cold? Most of the time the compressor is fine—your fridge side isn’t receiving cold air.
Here’s the clean, no-guesswork path: (1) confirm real temps, (2) clear supply/return vents, (3) prove airflow at the fridge vent, (4) check damper behavior, (5) rule out frost choking the evaporator. This is the same order techs use—because it avoids replacing parts blindly.
Key number #1Food safety: fridge should be ≤ 40°F (many aim ~37°F).
Key number #2Freezer target is 0°F for stable freezing and proper “shared air.”
Key number #3After airflow fixes, give it 6–12 hours (minimal door openings) to stabilize.
60-second “verdict” test (do this first)
- Feel test: hand at the fridge vent—do you feel a steady cool stream?
- Listen test: freezer back wall—steady fan whir, or scraping/silence?
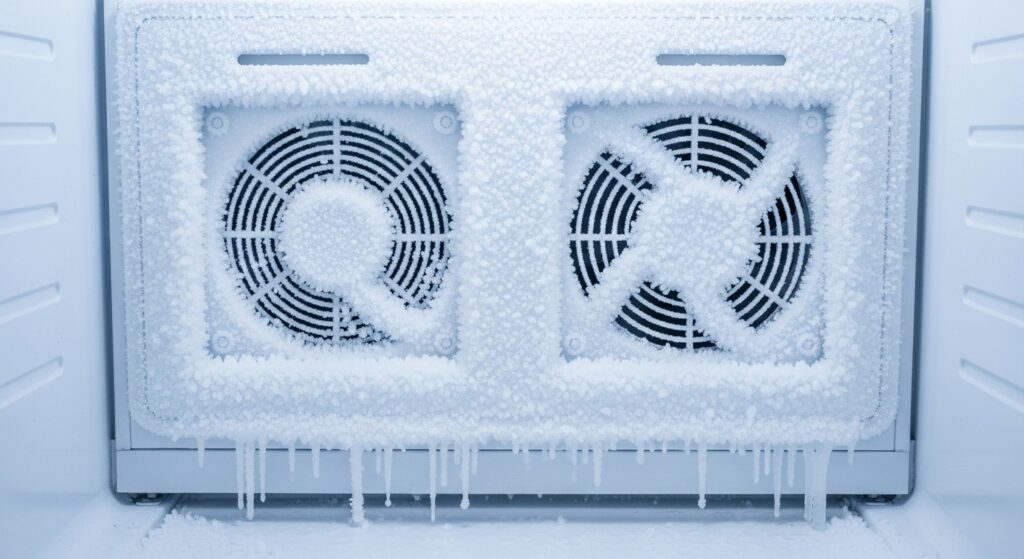
- Frost clue: thick frost on freezer rear panel often means airflow is being choked by ice.
⚠️ Safety first (avoid the expensive mistake)
- Unplug before removing covers, reaching near a fan, or warming ice.
- Do not chip ice with knives/screwdrivers—punctures can damage coils or wiring.
- Food safety: if the fridge is above 40°F and milk/leftovers feel warm, move perishables to a cooler immediately.
- Stop now if you smell burning, see scorching, or breakers trip repeatedly.
Last Updated: 2026-01-28 • Practical model: freezer makes the cold, fridge side receives it through a fan + damper “air pipeline.”
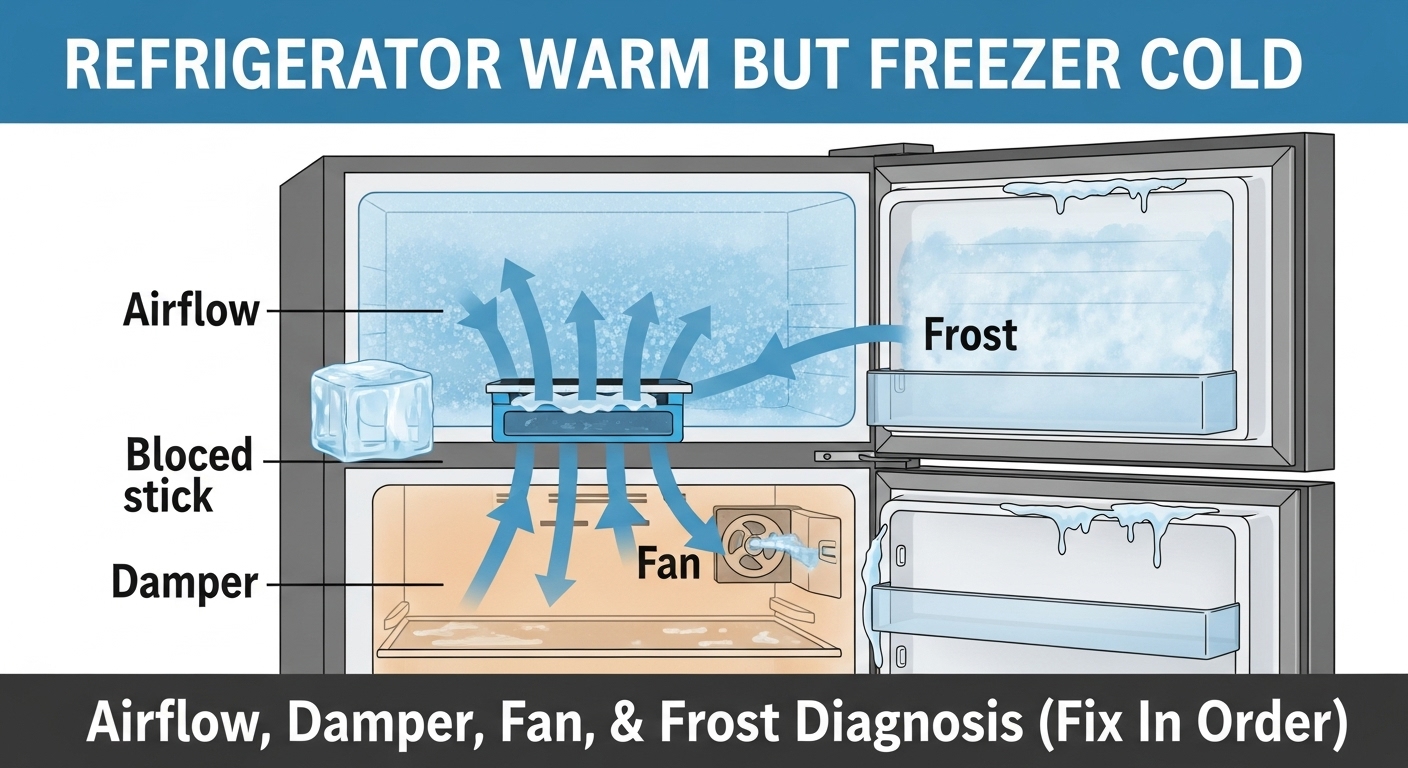
This symptom feels like your fridge is “half dead,” but it’s usually a delivery problem, not a compressor problem. Think of the freezer as the cold engine and the fridge as the room that gets cooled through a controlled tunnel. When that tunnel is pinched—by blocked vents, a stuck damper door, a weak evaporator fan, or frost/ice—your freezer stays solid while the fridge warms up first.
On this page
1) How the airflow system works
2) 5-step fix protocol (safest order)
3) Diagnostic matrix (symptom → meaning → next move)
4) Timing plan for the next 24 hours
5) Repair vs replace (money verdict)
6) Common mistakes that make it worse
7) FAQ
8) Internal links + references
How the airflow system works (simple model you can actually use)
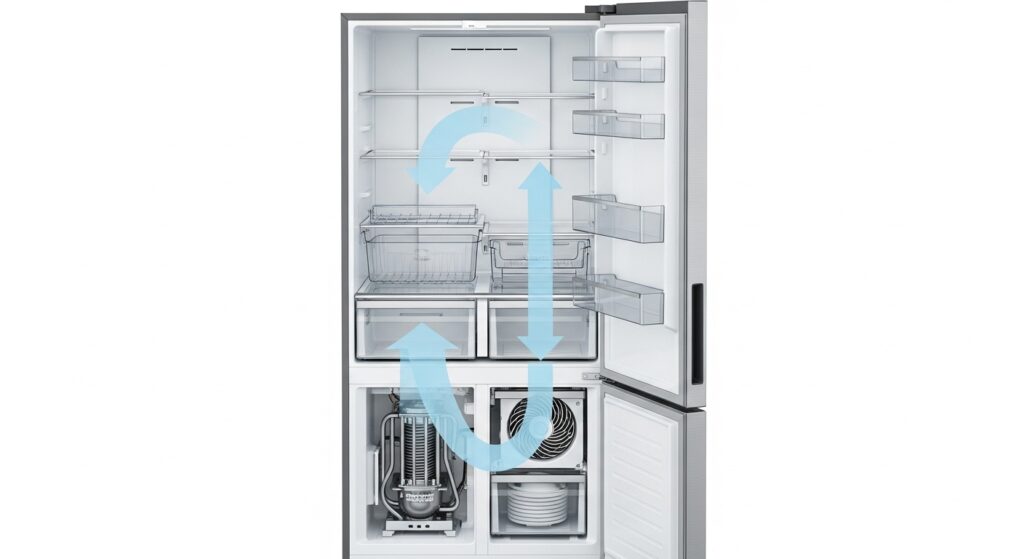
In many refrigerators, there’s one main cooling coil in the freezer section (the evaporator). A fan pulls air across that coil, then pushes a portion of that cold air into the fridge section through a controlled door called the damper. Air must also return back through return vents—so it’s a loop, not a one-way blast. If any part of that loop is blocked, the fridge warms even while the freezer stays cold.
A “real life” translation
Cooling is delivered by moving air. So a freezer can be “cold enough” while the fridge side is starving. If you can’t feel airflow at the fridge vent, don’t waste time adjusting dials—you need to restore the airflow path.
| Component | What it does | If it fails, you’ll notice… | Best first check |
|---|---|---|---|
| Evaporator fan | Moves cold air off the coil and through vents | Weak/no airflow at fridge vent; odd scraping or silence | Listen at freezer back wall + door switch test |
| Damper door | Controls how much freezer air enters the fridge | Fridge warm while freezer cold; sometimes a “cold corner” near vent | Check for movement/sound when settings change |
| Supply/return vents | Air must circulate out and back | Overpacked shelves; uneven temps; warm zones | Clear 1–2 inches around vent openings |
| Frosted evaporator | Ice blocks airflow through the coil | Problem worsens over days; heavy frost patterns | Manual defrost “test” (returns fast = defrost issue) |
The 5-step fix protocol (safest order, zero guessing)
- Step 1 — Confirm real temperatures (don’t trust the dial):
Place a thermometer in the center of the fridge (not touching walls) and one in the freezer (also not touching walls).
Targets: Fridge ~37°F (must be ≤ 40°F), Freezer ~0°F.
Interpretation: if the freezer isn’t near 0°F either, you may have a broader cooling capacity issue (jump to internal links at the end). - Step 2 — Clear supply + return vents (the #1 hidden cause):
Find the cold-air supply vent (where cold enters) and the return vent (where air exits). Clear both.
Keep 1–2 inches of space around vents. Don’t press food against the back wall (air channels often run there).
Reality check: if vents were blocked, this alone can fix it—but you must give it time (Step 6–12 hours). - Step 3 — Prove airflow at the fridge vent (yes/no test):
Close the fridge door for 60 seconds, then open and place your hand at the vent.
Strong airflow = delivery is happening; focus on settings, seals, and load.
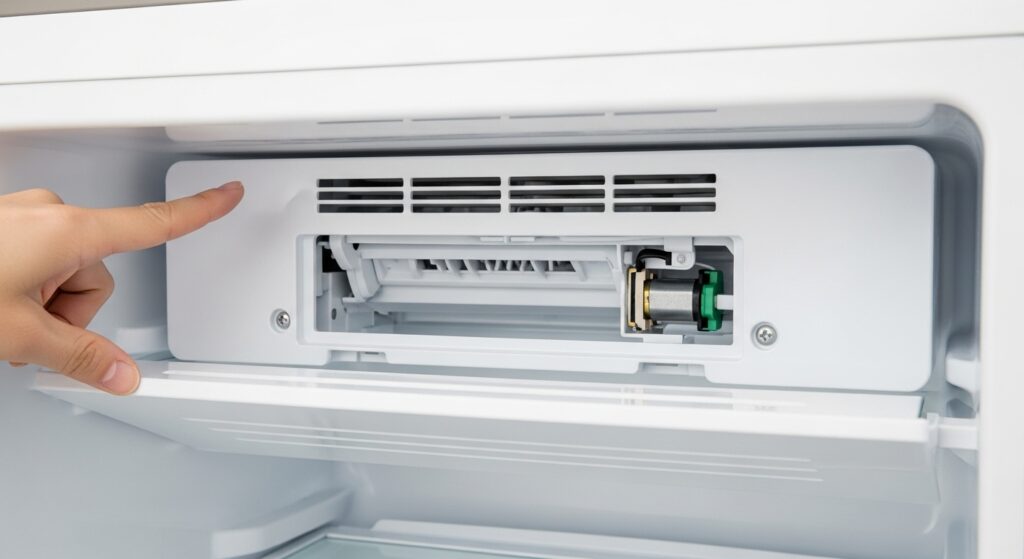
Weak/no airflow = you’re in the fan/damper/frost bucket—continue to Step 4 and Step 5. - Step 4 — Check damper behavior (do not force anything):
The damper is often near the upper vent in the fridge section. Adjust the temperature control slightly and listen for a faint motor sound (some models respond slowly).
If the damper is stuck closed, the fridge warms while the freezer stays cold. If stuck open, items near the vent can freeze while other areas warm.
Important: don’t pry the flap—plastic gears strip easily. - Step 5 — Rule out frost/ice choking the evaporator (the “returns in a week” clue):
If the problem worsens over days, airflow gets weaker, or you see unusual frost patterns, assume airflow is being choked by ice.
The safest confirmation is a full manual defrost (power off, doors open, towels ready). Let it melt naturally—no sharp tools.
If cooling improves then fails again within 5–7 days, that’s a strong sign of a defrost system problem (heater/sensor/control).
Pro tip (the “don’t get fooled” stabilization rule)
After you clear vents and restore airflow, keep door openings minimal for a few hours. Frequent openings can make a recovering fridge look “still broken” even when the fix is working.
Diagnostic matrix (symptom → meaning → best next move)
| What you notice | Most likely bucket | Best first move | What NOT to do |
|---|---|---|---|
| Freezer cold, fridge warm, weak vent airflow | Fan airflow, damper stuck, or frost block | Step 3 airflow → Step 4 damper → Step 5 frost | Don’t keep turning the dial colder. |
| Fridge warm but a corner near the vent freezes | Damper imbalance / airflow short-circuit | Clear vents + check damper behavior + redistribute items | Don’t block vents “to stop freezing.” |
| Problem returns 5–7 days after defrost | Defrost-system failure (recurring frost choke) | Plan service diagnosis (heater/sensor/control) | Don’t chip ice with sharp tools. |
| Airflow feels strong, but temps stay warm | Settings/load/seal or broader cooling issue | Verify seals + coils + full cooling checks | Don’t assume “airflow solved everything.” |
| Burning smell / hot plug / breaker trips | Electrical hazard | Unplug immediately and contact qualified service | Stop testing cycles. |
Timing plan (what to do today, in order)
| Time window | Do this | Why it matters |
|---|---|---|
| 0–30 minutes | Thermometer readings + clear vents + reduce overpacking | Eliminates the most common “air can’t move” causes fast. |
| 30–90 minutes | Airflow feel test at vent + damper listen check | Confirms whether cold air is being delivered to the fridge side. |
| 6–12 hours | Re-check temps (minimal door openings) | Shows whether airflow fixes stabilized the compartment. |
| 12–24 hours | If still warm: frost/defrost pathway + plan service if recurring | Recurring frost issues usually need defrost-system diagnosis. |
Repair vs replace (the money verdict)
Most “freezer cold + fridge warm” fixes are high-ROI because they’re airflow parts, not sealed-system work. Use this table to avoid chasing the wrong repair.
| Component | Typical part cost | Decision logic |
|---|---|---|
| Damper assembly | $60–$150 | Fix. Common airflow choke point; good ROI. |
| Evaporator fan motor | $40–$120 | Fix. Restores cold-air delivery; often extends life for years. |
| Sealed-system leak | $600+ (pro) | Replace if older unit or cost approaches half of a new fridge. |
Common mistakes that make this drag on
- Cranking “Max Cold.” If an air duct is already frosting, colder settings can accelerate the ice choke.
- Chipping ice with tools. One puncture can turn a fixable airflow issue into a major repair.
- Forcing the damper flap. Plastic gears strip easily—now you’ve created a parts replacement.
- Overpacking vents. A “cold” freezer can still starve the fridge if return/supply paths are blocked.
Stop DIY efforts if:
You smell burning, the plug/outlet is hot, breakers trip, you see scorched wiring, or temperatures won’t improve after vent + airflow steps. At that point, safer diagnosis requires proper tools and training.
FAQ
Why is the freezer fine but the fridge warm?
Because many designs cool the fridge by sending freezer air through a fan-and-damper pathway. If that pathway is blocked (vents/ice) or the damper/fan is failing, the fridge warms first.
How long should I wait after clearing vents?
Give it 6–12 hours with minimal door openings. Airflow fixes stabilize gradually—not instantly.
Can a bad door seal cause this exact symptom?
A poor seal can worsen temps and run time, but “freezer cold + fridge warm” usually points to airflow delivery first. Still, check seals if you see condensation or long constant running.
Is manual defrost a real diagnostic test?
Yes. If a full manual defrost restores airflow and fridge cooling temporarily but the problem returns within 5–7 days, recurring frost choke is likely—often tied to the defrost system.
When should I call a professional?
Call for help if you see electrical heat signs, severe ice you can’t safely defrost, repeated breaker trips, or no improvement after the airflow protocol.
Internal links
- https://homefixatlas.com/refrigerator-not-cooling-fix-guide/ — If both sections struggle, use this full cooling checklist (coils, airflow, seals).
- https://homefixatlas.com/freezer-frost-build-up/ — Frost patterns + air leaks that explain why airflow gets choked over time.
- https://homefixatlas.com/refrigerator-temperature-fluctuating/ — If temps swing after you restore airflow, use this stabilization guide.
Sources & references
- FDA — Refrigerator thermometers & safe temperatures
- GE Appliances — Temperature controls and airflow between compartments
Professional disclaimer
This guide is informational and focuses on safe, external checks first. Internal electrical work, coil-area inspection, or forced component movement can be hazardous. If you suspect an electrical fault, repeated breaker trips, overheating, or unsafe conditions, stop and contact a qualified technician.
Update log: 2026-01-28 — Consolidated the airflow-first diagnostic path, added stabilization timing, expanded the symptom matrix, and verified temperature/damper references.

I publish step-by-step troubleshooting guides for common home appliance issues (washer, dryer, refrigerator, HVAC basics).
Content is written for everyday homeowners and cross-checked with manufacturer manuals, safety guidance, and trusted public resources.
Posts include practical checks, clear stop-signs for safety, and guidance on when it’s better to call a qualified technician. Updates are logged whenever steps or recommendations change.
Safety note: If you smell gas, see burning, or suspect electrical hazards—stop immediately and contact a qualified professional.