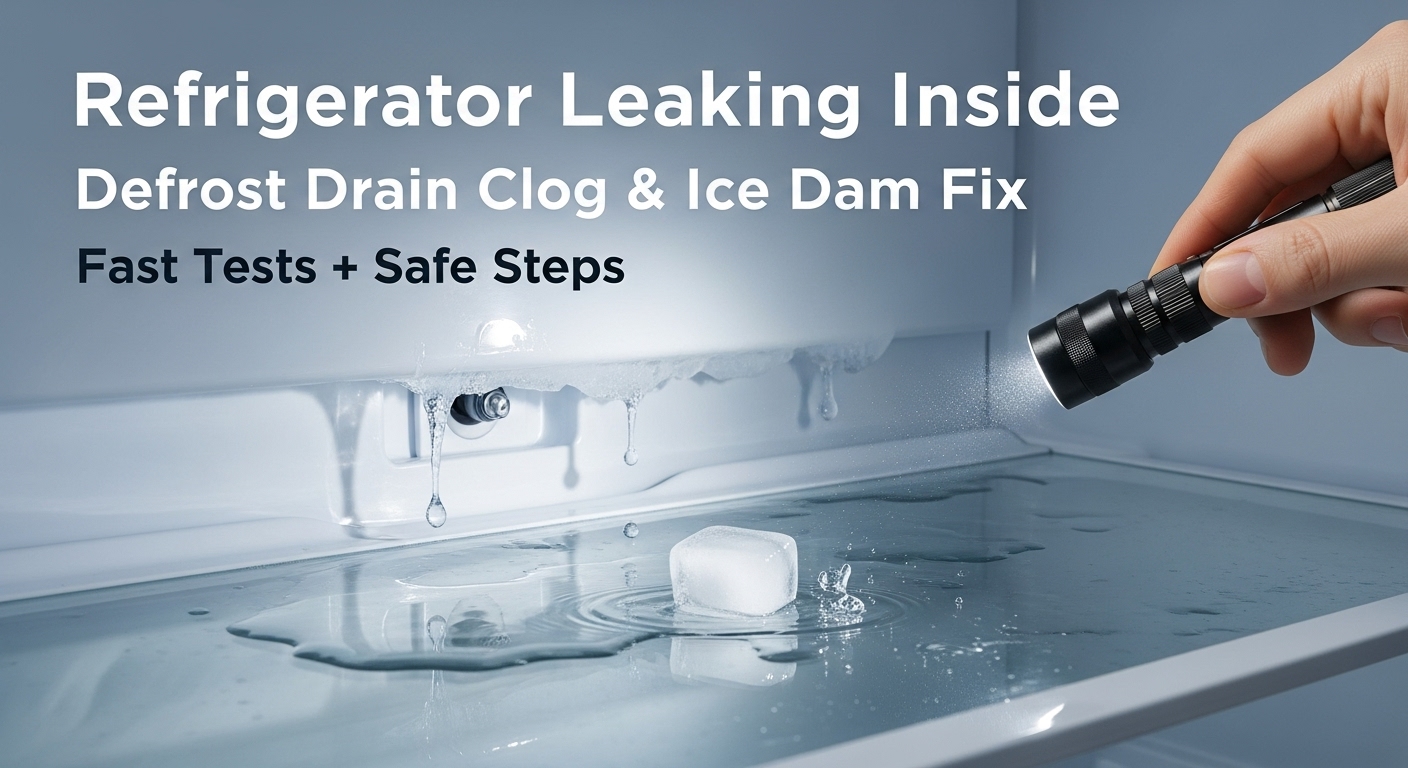
Q: Why is my refrigerator leaking water inside?
A: The most common “inside leak” is defrost meltwater that can’t drain. When the defrost drain hole/tube is clogged or frozen, water from the defrost cycle has nowhere to go—so it pools, refreezes into an ice sheet, then eventually overflows into the fresh-food section (often under the crisper drawers). Your fastest proof is simple: a safe hot-water flush test. If water won’t run to the drain pan underneath, the drain path isn’t open.
Key number #1Fridge ≤ 40°F / 4°C and freezer 0°F / −18°C are common safety targets. If temps drift warmer, defrost issues show up faster.
Key number #2Flush mix many techs use: 1 tbsp baking soda + 2 cups hot tap water (hot, not boiling).
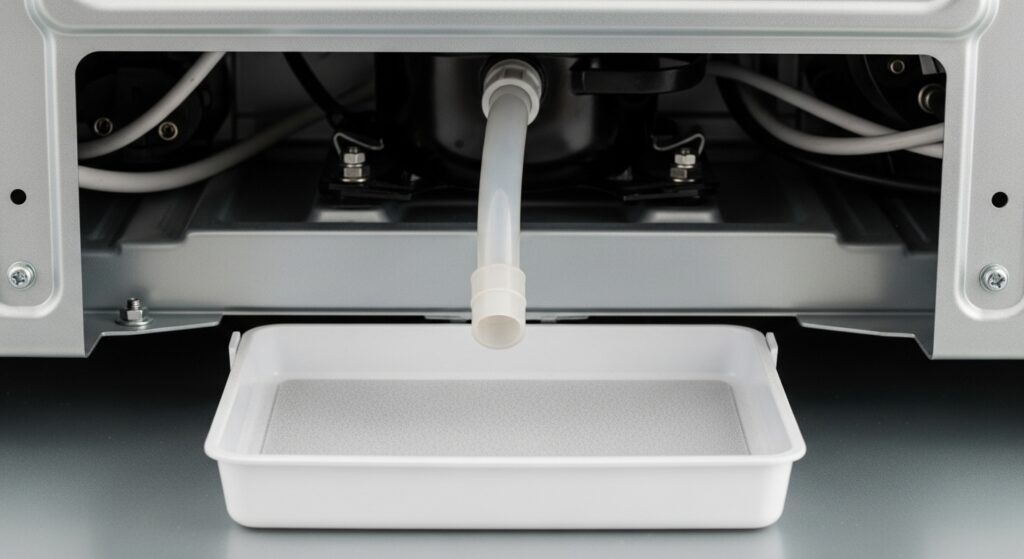
Key number #3Your “success sound” is water hitting the drain pan underneath. No sound often means the tube is still blocked or frozen deeper.
60-Second “Drain vs Not-Drain” Checklist
- Under crisper drawers? Drain overflow tracks forward most often.
- Ice sheet under the freezer basket? Classic frozen drain / ice dam clue.
- Worst in the morning? Many defrost cycles happen overnight, so you “see the result” at wake-up.
- Turn off water supply—does it stop? If yes, suspect ice maker/dispenser line instead of defrost water.
⚠️ Critical Safety (water + electricity is a bad combo)
- Unplug first before removing panels, pouring water into drain areas, or moving the unit.
- No knives / screwdrivers for ice. One puncture near liners or hidden lines can turn this into a major repair.
- Turn off the water supply if you suspect an ice maker/dispenser leak.
- Stop and call a pro if you smell burning, see scorching, hear loud electrical buzzing, or the unit keeps tripping a breaker.
Updated: 2026-01-29 • Snippet plan: locate water → prove drain path → melt ice dam → flush tube → prevent repeat leaks
A refrigerator leaking inside is annoying because the puddle lies to you. You wipe it up, it reappears, and it looks like a door seal, a crack, or “mystery condensation.” In real troubleshooting, the repeat offender is usually defrost meltwater that can’t reach the drain pan. Today you’re not guessing—you’re proving which water path is failing, with the safest checks first.
Leak Location Matrix: what your fridge is actually telling you
| Where you see water | Most likely root cause | Best first check | DIY level |
|---|---|---|---|
| Under crisper drawers | Defrost drain overflow tracks forward | Find freezer ice dam + flush test | Easy |
| Freezer floor (ice sheet) | Frozen drain hole / ice dam | Melt safely + flush until drain-pan sound | Easy |
| Near dispenser / ice maker side | Water line fitting or housing drip | Turn off water supply → observe 12–24 hours | Moderate |
| Wall droplets / “sweat” | Door seal / airflow / humidity imbalance | Check seal, closing, blocked vents, overpacking | Moderate |
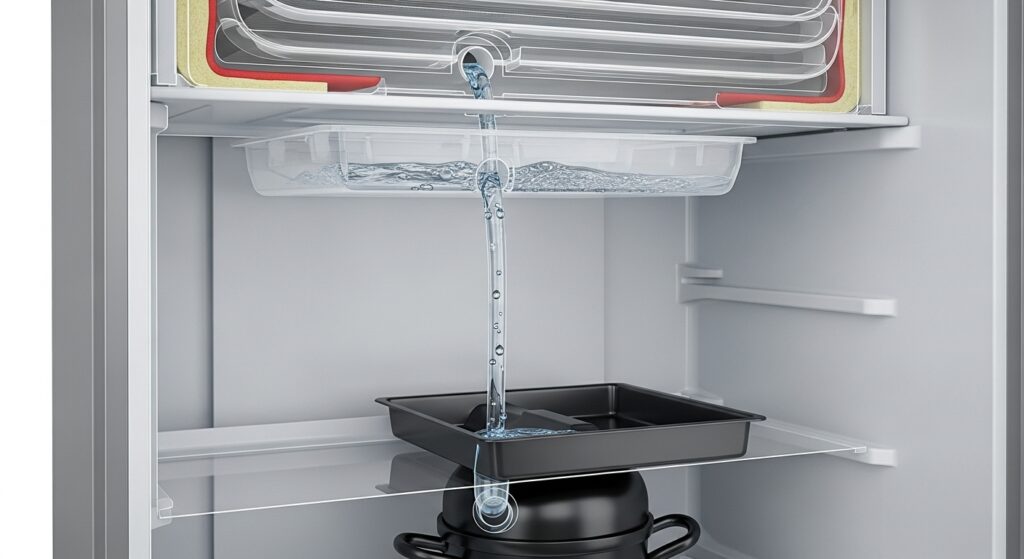
How the defrost drain works (simple mental model)
Frost forms near the evaporator area during normal cooling. Periodically, the refrigerator warms that zone to melt frost. That meltwater should flow into a small drain hole, down a drain tube, and into a drain pan underneath. If the drain hole/tube is clogged with debris or bio-slime—or it refreezes into an ice plug—water backs up and finds the easiest path: inside your fridge.
Quick logic you can trust
If the leak returns after you dry it and you didn’t use the dispenser, defrost meltwater climbs the suspect list fast—especially if it’s worse after idle time (overnight).
The Technician’s Toolkit (safe, low-risk)
You’re not doing a full teardown. You’re clearing a drain path safely. These tools keep it controlled:
- Turkey baster / bulb syringe: Controlled hot-water flushing.
- Soft towels: Catch meltwater, protect floors.
- Baking soda: Helps break up slime + reduce odors in the tube.
- Flexible pipe cleaner (gentle): For soft debris in the tube (no forcing).
Field notes: common “repeat clog” patterns by design
- Some Samsung / LG designs: A small drain-warming clip or heater detail may be involved in repeat freeze-ups. If you clear the drain but it refreezes quickly, it may need a service-level check.
- Some Whirlpool / Maytag designs: A rubber end-piece (“duckbill” style) can collect slime and restrict flow. If the inside drain seems open but you never get steady drain-pan flow, the restriction may be farther down the line.
- Some GE designs: A trap-like section can hold debris. If flushing works temporarily but clogs return fast, gentle tube cleaning may be needed (without forcing tools).
The 5-Step Precision Fix Protocol (safest order)
- Step 1 — Build a clean baseline (2 minutes):
Remove crisper drawers or freezer bottom basket (as accessible), then dry everything completely. You want “fresh evidence,” not leftover water.
Clue: If water returns without using the dispenser, defrost water becomes the prime suspect. - Step 2 — Find the drain zone and the ice dam clue:
In many designs the drain hole is in the freezer section near/under a panel or trough. If you see a thin ice sheet, slush, or a “moat” near the back/bottom, treat it as a frozen drain path until proven otherwise. - Step 3 — Melt safely (no chipping, no rushing):
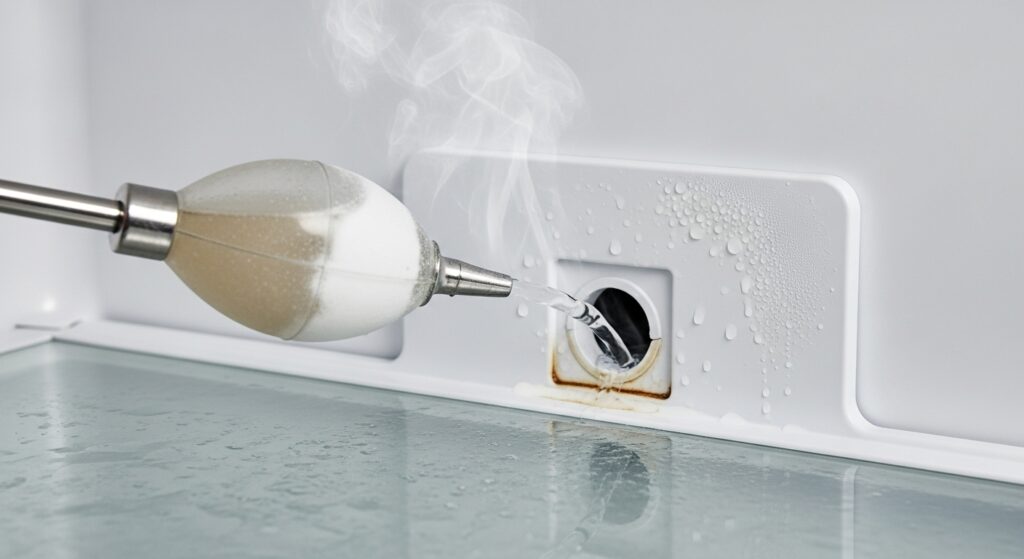
Unplug the refrigerator. Use towels + warm/hot tap water (not boiling) to melt ice gradually. The aim is to free the drain opening without damaging plastic or hidden components. - Step 4 — Flush the drain (this is the proof step):
Use a turkey baster to push hot tap water into the drain hole. If it pools and won’t go down, it’s still restricted or frozen deeper.
Optional flush mix: 1 tbsp baking soda + 2 cups hot tap water.
Confirmation: Flush until you hear water hit the drain pan underneath. - Step 5 — Prevent the repeat leak:
Ensure vents aren’t blocked by tightly packed food (airflow problems increase icing/condensation patterns). If your unit has a rear drain tube/pan area, make sure the tube isn’t pinched and the pan is seated correctly. If leaks return quickly after a successful flush, consider service for a deeper restriction or a defrost-system issue.
Pro tip (the “boring” habit that saves real money)
After you fix it once, do a quick maintenance flush once or twice a year (hot tap water, not boiling). It reduces slime buildup and helps prevent the same leak from coming back at the worst time.
Diagnostic matrix (symptom → best next move)
| What you notice | Most likely bucket | Best first move | Stop / caution |
|---|---|---|---|
| Water returns under drawers after you dry it | Defrost drain overflow | Find freezer drain zone → melt ice → flush until drain-pan sound | Unplug before flushing |
| Ice sheet under freezer basket | Frozen drain hole (ice dam) | Melt slowly + repeat hot-water flush | No sharp tools |
| Leak stops when water supply is off | Ice maker/dispenser water path | Inspect fittings/lines (service if unsure) | Don’t ignore slow drips |
| Condensation droplets, no puddles | Seal/airflow/humidity issue | Check seal, closing, vent blocking, overpacking | Replace torn seals as needed |
| Burning smell / breaker trips / scorching | Electrical hazard | Stop use → unplug → professional help | Stop now |
Timing plan (what to do in the next hour)
| Time window | Do this | What it answers |
|---|---|---|
| 0–10 minutes | Dry everything + identify the highest wet point | Stops false clues and shows source direction |
| 10–30 minutes | Check freezer floor for ice dam near drain zone | Confirms “frozen drain” pattern quickly |
| 30–60 minutes | Unplug → melt safely → flush until drain-pan sound | This is the actual fix for many inside leaks |
Common mistakes (and why they backfire)
- Wiping the water and calling it done. If the drain is still restricted, the next defrost cycle recreates the leak.
- Chipping ice with sharp tools. One puncture can create a far bigger problem than a clog.
- Using boiling water. Hot tap water is safer around plastics and liners; repeat flushes are better than extreme heat.
- Ignoring the water-supply side. A slow ice-maker drip can mimic a drain leak and keep puddles coming back.
The verdict: repair vs. replace logic
| Repair need | Est. cost (DIY) | Typical service cost | Decision |
|---|---|---|---|
| Drain clog / ice dam | $0–$15 | $150–$250 | FIX. High ROI, low risk if done safely. |
| Recurring freeze-up after successful flush | Varies | Often diagnostic visit | FIX (service). May involve defrost-system checks. |
| Cracked internal liner / structural damage | N/A | N/A | REPLACE. Often not economically repairable. |
Expert prevention tip
After you clear a clog, keep vents unblocked and do a short flush on a schedule. The goal is not perfect cleanliness—it’s preventing bio-slime from narrowing the drain tube again.
FAQ
Is it condensation or a leak?
Small droplets on walls are often condensation (seal/airflow/humidity). A standing puddle under drawers or an ice sheet in the freezer is more consistent with a drain/defrost overflow.
Why does the leak look worse in the morning?
Many fridges produce noticeable defrost meltwater during idle time. If the drain is restricted, the overflow builds quietly—and you discover it later.
How do I know the drain is truly open?
The best confirmation is hearing water hit the drain pan underneath after a flush. If you never get that, the tube may still be blocked or frozen farther down.
Can I use a hair dryer to melt the ice?
It’s not my first choice. Concentrated heat can warp plastic or stress components. Warm/hot tap water + patience is safer for most people than high heat.
What if the leak stops when I shut off the water supply?
Then a pressurized water path (ice maker/dispenser line, fitting, or housing) is likely involved. Drain flushing alone won’t solve a water-supply drip.
When should I stop DIY?
Stop if you can’t unplug/move safely, panels require complex disassembly, you suspect electrical overheating, or the unit can’t hold safe temperatures. Safety beats “one more test.”
Internal Links
- https://homefixatlas.com/refrigerator-water-leaking-on-floor-7-proven-fixes-for-drain-and-gasket-issues/ — When water travels, this helps you separate drain overflow vs gasket vs water-line drips.
- https://homefixatlas.com/refrigerator-water-leaking-on-floor/ — A quick source-tracking method when puddles show up far from the real cause.
- https://homefixatlas.com/fridge-odor-removal/ — If leaks created musty odors, use this cleanup plan after the drain is cleared.
Sources
- GE Appliances Support: Clogged defrost drain guidance
- Whirlpool: Refrigerator leaking water (defrost drain as a key check)
- FDA: Cold food safety temperature guidance
Final Safety Note
This guide is informational and focuses on low-risk steps first. If the leak is paired with electrical buzzing, burning smells, repeated breaker trips, or the refrigerator can’t hold safe temperatures, disconnect power and consult a qualified professional.
Update log: 2026-01-29 — Combined drain-first proof tests, leak-location matrix, safer flush confirmation rule, and prevention steps to reduce repeat clogs.

I publish step-by-step troubleshooting guides for common home appliance issues (washer, dryer, refrigerator, HVAC basics).
Content is written for everyday homeowners and cross-checked with manufacturer manuals, safety guidance, and trusted public resources.
Posts include practical checks, clear stop-signs for safety, and guidance on when it’s better to call a qualified technician. Updates are logged whenever steps or recommendations change.
Safety note: If you smell gas, see burning, or suspect electrical hazards—stop immediately and contact a qualified professional.