Updated: 2026-01-30 • One-page plan: water-off → drip test → fill tube alignment/ice → pressure basics → safe next steps
Q: Why is my ice maker overfilling and leaking?
A: In 80% of cases, it is a failing water inlet valve or low water pressure (under 20 PSI). Low pressure prevents the valve from sealing shut, while a faulty solenoid stays stuck open. Also, check for “Bio-slime” in the fill tube which can cause water to splash outside the mold.
On this page
How it works5-step fix protocolTechnician toolkitDiagnostic matrix1-hour timing planCommon mistakesFAQ
Ice maker overfilling? In most homes it’s not “mystery electronics.” It’s usually a valve that won’t fully shut, low water pressure that prevents a clean shut-off, or a fill tube/cup that’s misaligned and splashing outside the mold.
The fastest no-guess plan: (1) stop the water safely, (2) check if water is “dripping” when it should be OFF, (3) confirm fill tube alignment/icing, (4) check pressure basics, (5) only then consider parts.
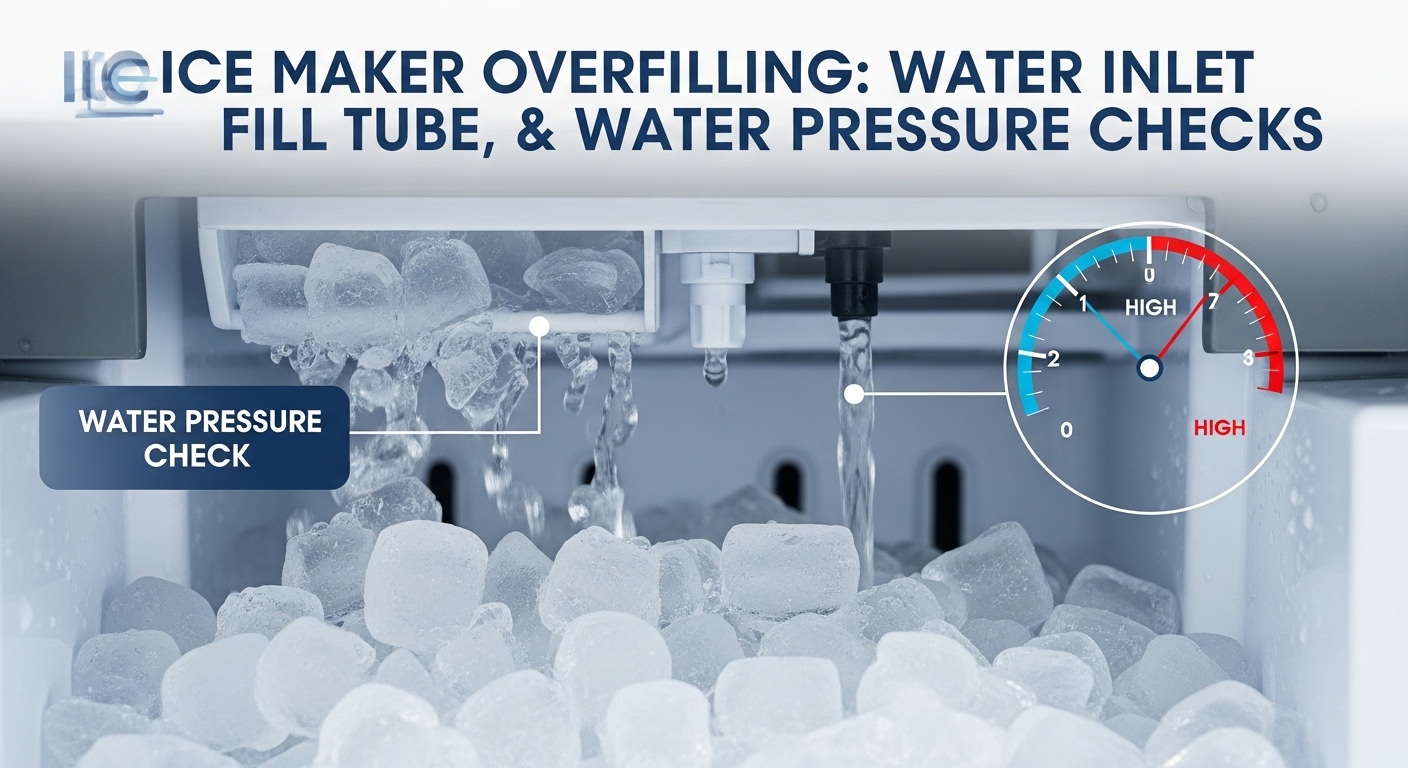
Key number #1Most fridge ice makers need at least ~20 psi water pressure for the inlet valve to behave correctly (opening + shutting off cleanly).
Key number #2The fill tube should sit centered over the fill cup/mold. Even a small offset can “spray” and look like overfilling.
Key number #3If water is slowly dripping when the ice maker is not calling for water, that’s a strong sign of a valve that isn’t sealing.
Why this one-page guide exists
- Overfilling can freeze the chute, glue the bin in place, or create a “solid block” that kills production.
- Many people replace the ice maker first. But a leaking inlet valve or fill tube icing can wreck the new part too.
- This page is built to get you to the real cause with the least risk: water-off → drip test → alignment/ice check → pressure check → next steps.
⚠️ Safety first (water + electricity combo)
- Turn off the water supply before disconnecting any water line. Keep towels ready.
- Unplug the refrigerator before accessing the inlet valve area or wiring. Don’t work in a wet area with power connected.
- Stop and call a pro if you see scorched wiring, smell burning, or water is leaking near electrical components.
“Overfilling” looks dramatic—icicles, big slabs in the bucket, a frozen chute, water spilling under the bin. But the pattern is usually consistent. If water sneaks in when it shouldn’t, it slowly builds ice in the wrong places. If the fill stream is mis-aimed, it splashes outside the mold and freezes into weird shapes. The goal isn’t to memorize brand quirks—it’s to prove which kind of overfill you’re seeing: drip leak, spray/misalignment, or fill timing/pressure.
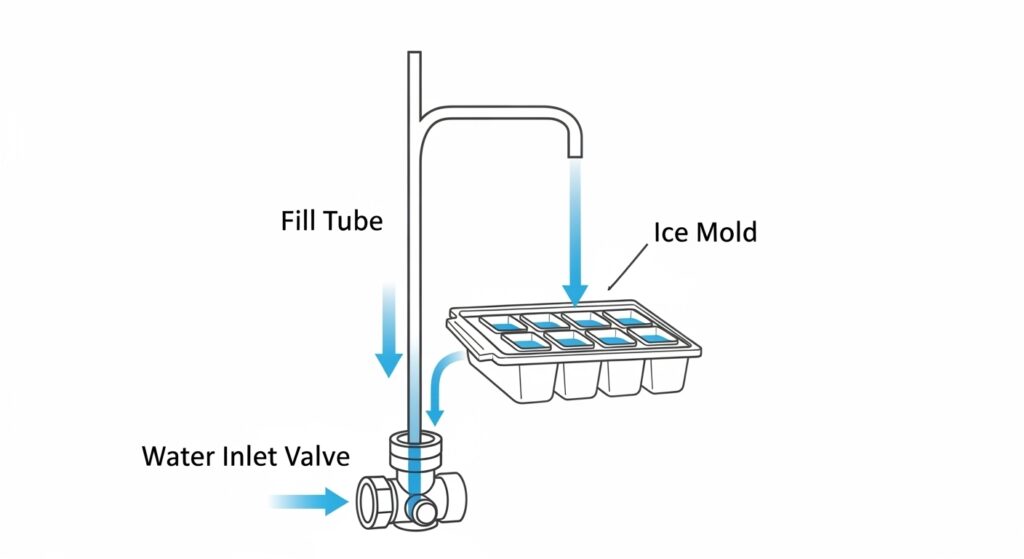
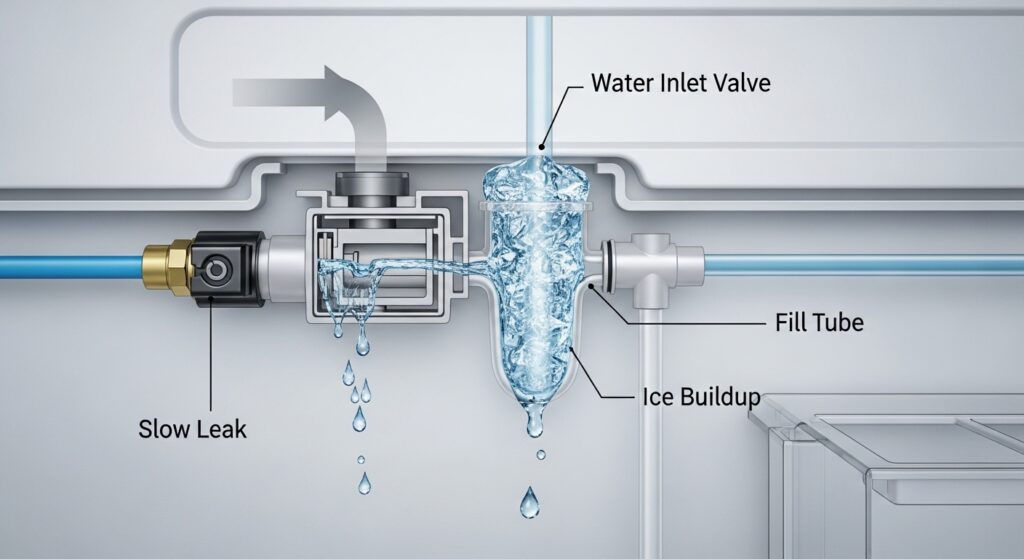
How the ice maker “fill” actually works (simple, not scary)
When the ice maker wants water, it energizes the water inlet valve for a short time. Water travels through a small line and exits the fill tube into the ice mold (sometimes through a fill cup/funnel). Overfill happens when the system can’t stop cleanly, or the water doesn’t land where it’s supposed to.
The quick physics (why pressure matters)
Think of flow like this: $$Q \approx \frac{\Delta P}{R}$$ If pressure ($\Delta P$) is too low, some valves don’t “seat” (seal) crisply. That can cause a slow drip after the valve should be closed. If pressure is too high or the stream is mis-aimed, you can get splash and weird ice shapes that look like overfill.
| What you see | What it often means | Best first check |
|---|---|---|
| Water/ice building up near the fill tube | Slow drip or fill tube freezing | Drip test + check tube for ice plug |
| Water misses the mold / splashes | Fill tube or cup misalignment | Alignment check (centered stream) |
| Huge cubes / slabs in the bin | Too much water per fill, or repeated fill | Pressure basics + valve behavior |
| Chute freezes / dispenser jams | Leak/splash leading to freeze-up | Stop water, thaw safely, then diagnose |
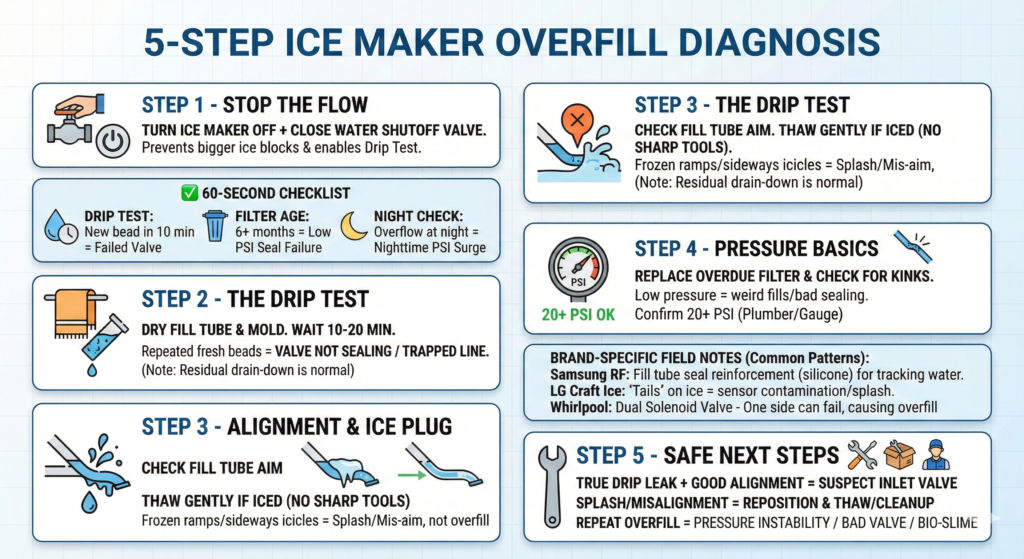
Priority Fix Protocol (5 steps, safest order)
- Step 1 — Stop the problem from getting worse (water off + pause ice):
Turn the ice maker OFF and close the fridge water shutoff valve. If you can’t find it, stop here and locate it first.
This prevents bigger ice blocks while you diagnose. It also makes the next test (drip test) meaningful. ✅ 60-Second “Is it the Valve?” Checklist- The Drip Test: Dry the fill cup. Does a new bead of water appear within 10 minutes? = Failed Valve.
- Filter Age: Is your water filter 6+ months old? = Low PSI causing seal failure.
- Night Check: Does it only overflow at night? = Nighttime PSI Surge (City pressure spikes).
- Step 2 — The “drip test” (proves valve sealing behavior):
After water is OFF, dry the fill tube area and the top of the ice mold with a towel. Wait and look again in 10–20 minutes.
If you still see new water appearing (from a line that should be dry), you’re likely dealing with a valve that doesn’t seal or a trapped line slowly draining.
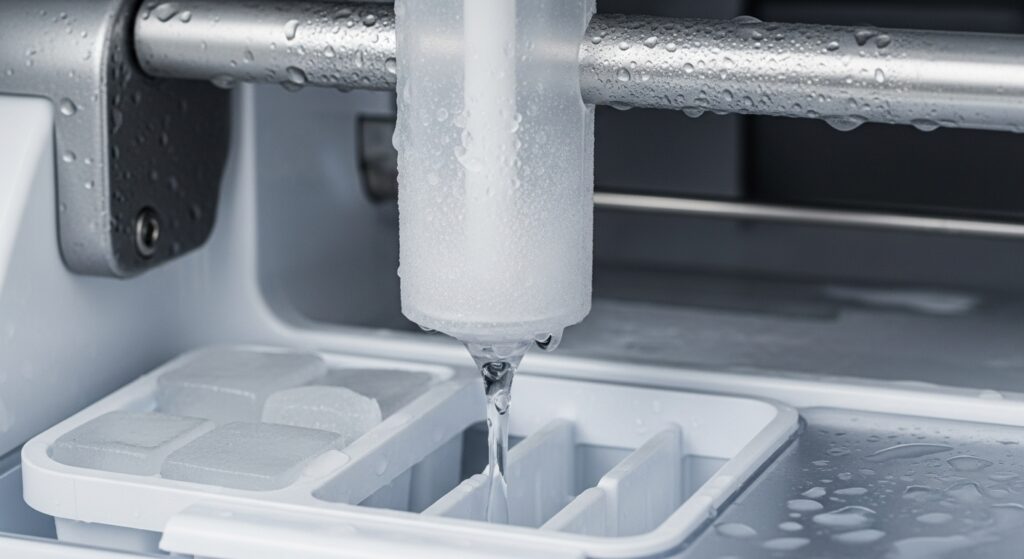
Note: A little “residual drain-down” can happen after shutoff. The key is a repeated fresh bead that keeps coming back. - Step 3 — Check fill tube alignment + ice plug (splash vs freeze):
Look at where the fill tube points. It should aim into the fill cup/mold, not at the wall of the ice maker.
If the tube is packed with ice, thaw gently (no sharp tools). An ice plug can redirect flow and “spray” outside the mold.
Quick tell: “Frozen ramps” or sideways icicles usually mean splash/mis-aim, not true electronic overfill. - Step 4 — Pressure basics (the “20 psi” reality check):
Replace an overdue filter and confirm the supply line isn’t kinked behind the fridge. Low pressure can cause weird fill behavior (including valves not sealing cleanly).
If you suspect pressure problems (very slow dispenser flow too), consider a simple water-pressure gauge test or have a plumber confirm supply pressure. Brand-specific field notes (common repeat patterns)- Samsung (RF Series): If the Ice Room fill tube doesn’t seal tightly to the housing, water can track down the wall and freeze the bin. In that case, it may need silicone sealing reinforcement rather than a valve replacement.
- LG (Craft Ice): Round-ice units can be sensitive to level/position sensor contamination. If you start seeing “tails” on ice, treat it as an early warning for unstable fills or splash conditions.
- Whirlpool: Many models use a dual solenoid inlet valve. One solenoid can fail while the dispenser still seems “fine,” causing the ice maker side to overfill.
- Step 5 — Safe next steps (what to replace vs what to service):
If the pattern is a true drip leak and alignment is fine, the inlet valve becomes a top suspect. If you’re not comfortable unplugging and accessing the valve area, book service.
If it’s clearly splash/misalignment, you may solve it with careful repositioning and a full thaw/cleanup—no parts needed.
If you’ve had repeat overfill after “fixes,” assume there’s a reason: pressure instability, valve not sealing, or bio-slime/ice changing the stream.
| Repair Scenario | Est. Cost (DIY) | Verdict |
|---|---|---|
| Water Filter Replace | $30 – $50 | 90% Success Rate |
| Inlet Valve Solenoid | $35 – $75 | Fix Immediately |
| Main Ice Maker Module | $150 – $250 | Replace if >8 years old |
Technician toolkit (optional, precision checks)
- Multimeter check (inlet valve coil resistance): Many ice maker inlet valve solenoids read roughly 200–500 Ω. If you see “OL”, the coil is open (electrically failed). If resistance is extremely low, it can indicate a short. Unplug the fridge before touching terminals.
- Bio-slime (fill tube splash trigger): If you see pink residue at the end of the tube, the stream can bend and “spray” outside the mold. Clean the tube tip and fill cup carefully. A practical approach is a warm baking soda solution scrub, followed by a vinegar rinse, then a clean-water wipe (don’t pour strong chemicals into the unit).
- Pressure sanity check: If dispenser flow is weak too, treat “under ~20 PSI” as a serious suspect. Pressure issues can mimic a bad valve and create repeat failures.
These checks aren’t required for most owners. They’re here for the “I want to be 100% sure” moment—without guessing.
Diagnostic matrix (symptom → best next move)
| Symptom | Likely cause bucket | Best first move | Safety note |
|---|---|---|---|
| Icicles near fill tube / ice mound at the top | Slow drip or tube freezing | Water off → dry → drip test → thaw tube | Unplug if you access wiring. |
| Water splashed outside the mold | Misalignment or ice redirecting stream | Align tube/cup + remove ice ramp | No sharp tools on plastic. |
| Big slabs in the bin | Overfill volume or repeated fill | Pressure basics + valve suspicion | Avoid repeated test cycles. |
| Water dispenser is also weak | Filter/supply kink/pressure issue | Filter + line check + pressure test | Plumber check is safest. |
| Water leaking near electrical areas | Hazard | Unplug + shut water + service | Stop now. |
Timing plan (what to do in the next hour)
| Time window | Do this | Why it matters |
|---|---|---|
| 0–10 minutes | Turn ice OFF + water OFF, remove bin, wipe/dry fill area | Stops ice growth and sets up a clean drip test |
| 10–30 minutes | Drip test + check fill tube aim + look for ice plug | Separates drip leak from splash/freeze patterns |
| 30–60 minutes | Filter/supply line check + decide DIY vs service for valve access | Prevents misdiagnosis and repeat failure |
Common mistakes (that make overfilling come right back)
- Replacing the ice maker first. If the valve is leaking or pressure is wrong, a new ice maker can still overflow.
- Chipping ice with sharp tools. It’s an easy way to crack plastic parts or puncture a line—then you’ve got a real leak.
- Ignoring the filter/supply kink. Water delivery issues can create unstable fills and strange cube formation.
- “Just keep running it.” Overfill turns into freeze-up, then the bin/chute jams, then you lose ice entirely.
Serious cases (stop and call service)
Stop if water is leaking near wiring, you see any scorch marks, the fridge trips a breaker/GFCI, or you can’t fully shut off the water supply. If you’re unsure about pulling the fridge out safely or reconnecting water lines, service is the safer move.
FAQ
How do I know if it’s a real overfill vs water splashing outside the mold?
Look for “missed water” marks: ice sheets on the side wall, weird frozen ramps, or water trails that start at the fill tube and never sit evenly in the mold. True overfill tends to create overly large cubes/slabs inside the mold area itself.
Why does low water pressure matter if I’m getting water?
Some inlet valves rely on stable pressure to open and shut predictably. If pressure is low or unstable, you can get partial fills, long fills, or a “not quite sealed” shutoff that becomes a drip.
Can a clogged or frozen fill tube cause overfilling?
Yes—because the water stream can get redirected. Instead of dropping cleanly into the mold, it sprays, splashes, or runs along plastic and freezes where it shouldn’t. That new ice changes the stream again, and the pattern snowballs.
Does a new filter ever make this worse?
A fresh filter can change flow characteristics slightly, but it shouldn’t cause overflow on a healthy system. If overflow starts right after a filter change, it’s smart to check that the filter is the correct type and fully seated (no bypassing or misfit).
Is it okay to thaw ice with a hair dryer?
Gentle warmth can help, but keep heat moving and avoid overheating plastic. Never use open flame. If water lines or wiring are nearby and you’re unsure, a longer “door open + towels” thaw is slower but safer.
When should I stop DIY and book service?
If diagnosing requires accessing the inlet valve wiring/terminals and you’re not comfortable unplugging, moving the fridge, and reconnecting water lines safely, call a pro. Any electrical smell, heat, or leaking near wiring is also a hard stop.
Internal Links
- https://homefixatlas.com/ice-maker-not-working-after-filter-change/ — Fix path when issues start right after a filter swap (seating, flow, air in line).
- https://homefixatlas.com/ice-maker-making-small-or-hollow-ice-cubes/ — Water pressure + fill quality guide (helps confirm supply problems).
- https://homefixatlas.com/ice-maker-not-working/ — Full diagnostic tree if overfill turns into “no ice” or a frozen jam.
References
- Whirlpool: Ice maker troubleshooting (water inlet valve + water pressure baseline)
- RepairClinic: Ice maker overflowing (pressure minimum + inlet valve behavior)
Safety notice
This guide is informational and starts with low-risk checks. Any work around inlet valves, wiring, and water lines carries real risk. If you see leaking near electrical components, smell burning, or can’t fully shut off water safely, stop and contact a qualified technician.
Update log: 2026-01-30

I publish step-by-step troubleshooting guides for common home appliance issues (washer, dryer, refrigerator, HVAC basics).
Content is written for everyday homeowners and cross-checked with manufacturer manuals, safety guidance, and trusted public resources.
Posts include practical checks, clear stop-signs for safety, and guidance on when it’s better to call a qualified technician. Updates are logged whenever steps or recommendations change.
Safety note: If you smell gas, see burning, or suspect electrical hazards—stop immediately and contact a qualified professional.