Freezer making a loud humming noise? Here’s the fastest way to tell fan vs compressor (no tools first).
In most homes, a “suddenly loud hum” is usually (1) a fan rubbing frost/ice, (2) a condenser area airflow problem (dust/obstruction), or (3) normal compressor vibration amplified by the wall/floor. The shortcut is: door-switch test → location test → frost clue check.
60-Second Diagnosis Checklist
- Door test: Open the freezer door. Does the hum stop or change a lot? → likely evaporator fan / ice contact.
- Door switch test: Press the door switch (light should turn off). Noise changes with switch? → fan-side clue.
- Location test: Loudest inside back panel? → evaporator fan zone. Loudest rear bottom? → compressor/condenser fan zone.
- Resonance check: Pull the unit 2–3 inches from the wall (no panels). Hum drops? → clearance/vibration is part of the loudness.
Key numberTarget freezer temp is 0°F / −18°C. Setting colder can increase run time and make normal hum feel nonstop.
Safety noteRear service areas can involve live power and hot parts. Unplug before moving/cleaning behind the unit.
Cool-down timeAfter unplugging, wait 10–15 minutes before touching anything near the rear bottom area.
⚠️ Safety first (stop signs)
- Unplug before moving the appliance or accessing the rear service area.
- Never chip ice with sharp tools near the back panel (puncture risk).
- Stop and get qualified service if you smell burning, the outlet/cord is hot, you hear repeated hard clicking, or cooling is failing fast.
Updated: 2026-01-29 • One-page plan: 60-second tests → sound map → 5-step protocol → “stop now” signs
A freezer can hum loudly for normal reasons (compressor cycle), but the same sound can also mean a fan is rubbing frost, airflow is restricted, or vibration is being amplified by cabinets and tight wall clearance. The fastest way to avoid guessing is to identify where the sound is loudest.
Inside back panel loudness usually points to the evaporator fan + frost/ice zone. Rear bottom loudness usually points to condenser fan / airflow / compressor vibration. This page walks you through low-risk isolation tests first, then the safest fixes.
On this page
1) Sound source map
2) Priority protocol (5 safest steps)
3) Diagnostic matrix
4) Next-hour timing plan
5) Common mistakes
6) Repair vs replace logic
7) FAQ
8) Internal links
9) Sources
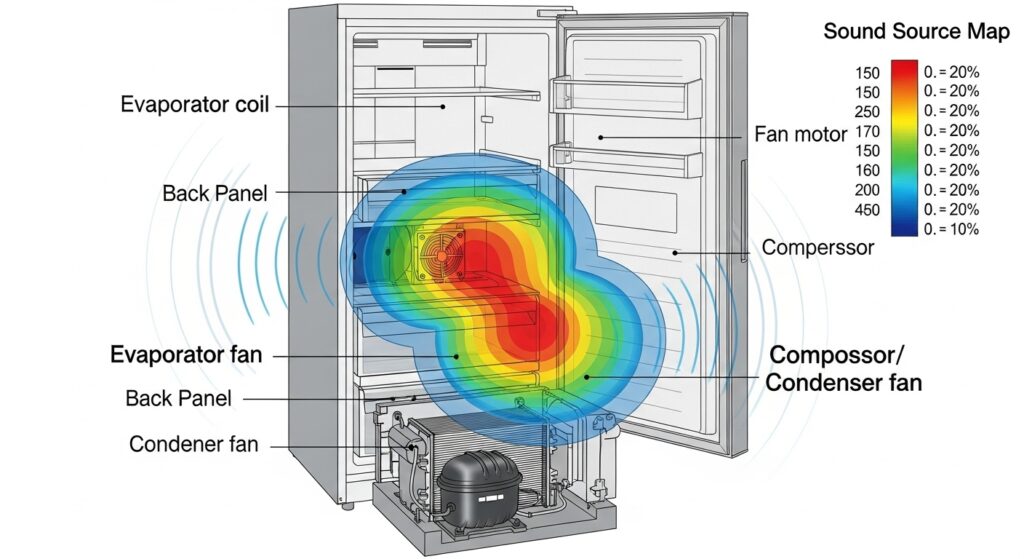
Sound source map (simple, reliable)
Most loud humming comes from one of two zones: (A) inside back panel (evaporator fan moving cold air) or (B) rear bottom (compressor + condenser fan releasing heat). Fans can hum loudly when they rub frost, wobble, or get obstructed. Compressor hum is usually deeper and steadier.
| Source | Where it sounds loudest | Common “loud hum” trigger | Safe first move |
|---|---|---|---|
| Evaporator fan | Inside freezer (back wall) | Fan blade grazing frost, worn bearings, loose cover | Door/switch test → frost clue check → controlled defrost |
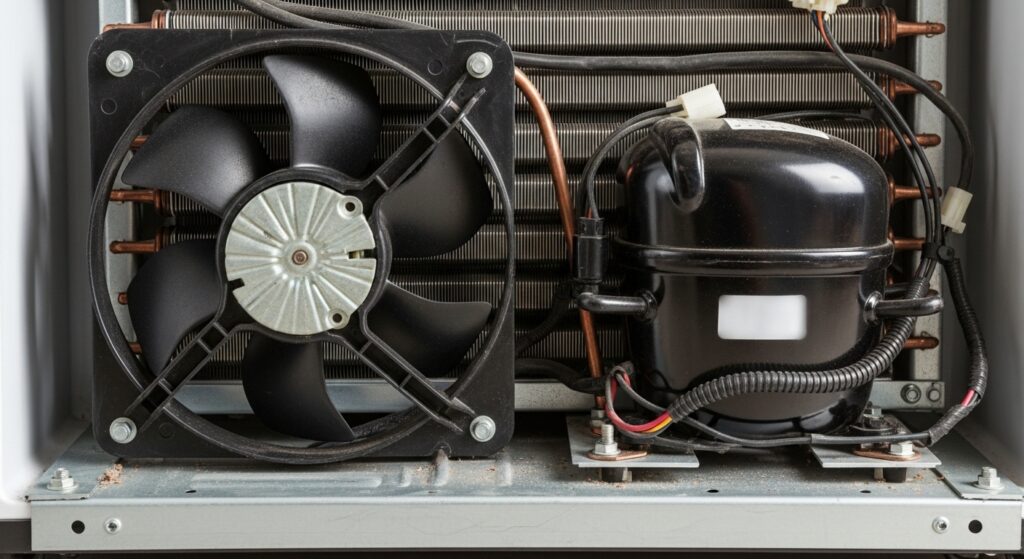
| Condenser fan | Rear bottom (outside) | Dust/lint, blade rubbing, obstruction, worn motor | Unplug → gentle rear cleaning + clearance |
| Compressor cycle | Rear bottom (outside) | Normal run cycle, vibration resonance, heavy workload | Check temps + airflow + wall clearance |
| Ice maker / water valve | Near ice bin / back area | Valve buzz during fill, cube drop noises | Temporarily switch ice maker off to isolate |
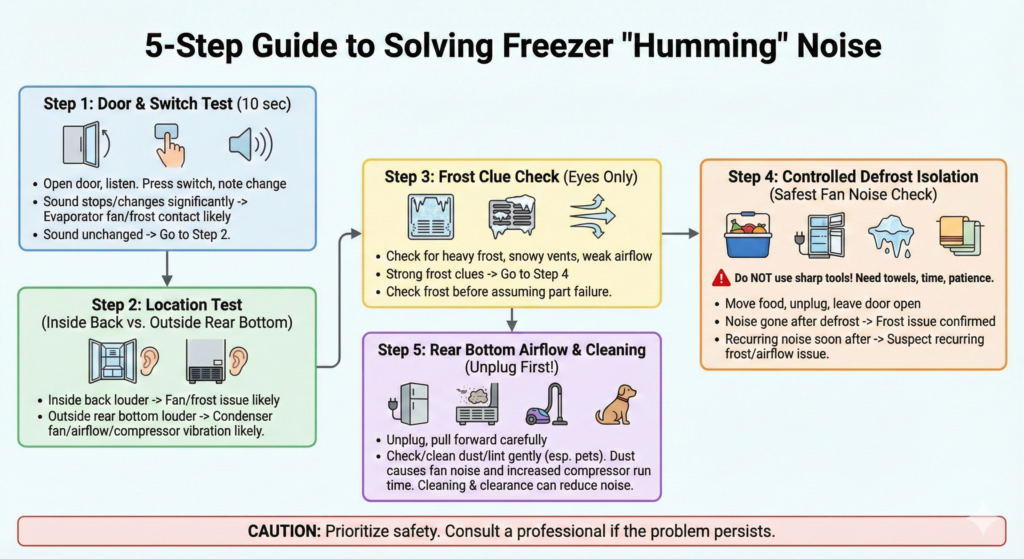
Priority protocol (5 steps, safest order)
- Step 1 — Door test + door switch test (10 seconds):
Open the freezer door and listen. Then press the door switch (the little button that tells the freezer it’s closed).
If the hum stops or changes a lot: likely evaporator fan / frost contact behavior.
If the hum is unchanged: continue to Step 2. - Step 2 — Location test (inside back vs rear bottom):
Listen near the freezer’s inside back wall, then listen behind the unit near the lower rear panel (without touching).
Inside-back loudest: fan/frost pattern is more likely.
Rear-bottom loudest: condenser fan/airflow/compressor vibration is more likely. - Step 3 — Frost clue check (eyes only):
Look at the inside back panel and vents. Heavy frost, snowy vents, or weak airflow often means the fan is fighting ice or airflow is restricted.
If you see strong frost clues, go to Step 4 before assuming parts are “dead.” - Step 4 — Controlled defrost isolation (safest proof of “fan hitting ice”):
If Steps 1–3 point to frost: move food to a cooler, unplug the unit, and leave doors open for a controlled defrost.
Never chip ice with sharp tools. Use towels, time, and patience.
Pattern clue: If the hum disappears after defrost but returns within days, suspect a recurring frost/airflow/defrost pattern. - Step 5 — Rear bottom airflow + gentle cleaning (unplug first):
Unplug, pull the fridge forward carefully, and check for dust/lint near the rear bottom intake/exhaust area (especially with pets).
Dust can make the condenser fan louder and increase compressor run time. Gentle cleaning + better clearance can reduce “constant hum.”
Pro tip (fast real-world clue)
If the hum drops when you pull the unit a few inches away from the wall, you likely have resonance + airflow contributing to the loudness. That’s a “fix the setup first” signal, not a “buy parts now” signal.

Diagnostic matrix (what you notice → best next move)
| What you notice | Most likely bucket | Best first move | Stop / caution |
|---|---|---|---|
| Noise changes with door switch | Evaporator fan / frost contact | Frost clue check → controlled defrost isolation | Don’t chip ice sharply. |
| Noise loudest at rear bottom | Condenser fan / airflow / vibration resonance | Unplug → gentle rear cleaning + clearance check | Stop if outlet/cord is hot. |
| Humming + temps rising | Airflow restriction, frost pattern, or deeper issue | Verify 0°F target, vents, seals; consider service if worsening | Don’t ignore rapid warming. |
| Hum + cabinet rattling | Leveling / wall contact / floor resonance | Increase clearance, check leveling, stabilize contact points | Avoid pinching cord. |
| Hard clicking + hum repeats | Start/overload risk | Stop cycling tests; seek qualified service | Stop now |
Next-hour timing plan (do this in order)
| Time window | Do this | What it answers |
|---|---|---|
| 0–10 minutes | Door test + switch test + location test | Fan-side vs compressor-side quickly |
| 10–25 minutes | Vent/frost visual check + clearance check | Ice contact vs resonance/airflow clues |
| 25–60 minutes | Unplug → gentle rear dust cleaning OR start controlled defrost isolation | Confirms obstruction vs frost pattern |
Common mistakes (and why they backfire)
- Skipping the door-switch test. It separates fan-side issues from rear-bottom issues fast.
- Chipping ice with a knife or screwdriver. One puncture can turn a noise problem into a major failure.
- Turning the freezer colder to “fix” the noise. It often increases run time and makes hum feel constant.
- Ignoring rear dust buildup. Dust can raise workload and make fans louder over time.
Loud noise feels urgent, so people jump straight to “the compressor is dying.” But most cost-saving wins come from isolation + airflow + frost control before parts.
Repair vs replace logic (simple framework)
A practical way to decide
If the issue is dust/clearance or fan rubbing frost, it’s usually worth fixing. If you have repeated hard clicking, rapid warming, or signs of electrical overheating, stop DIY and get service.
| What you confirmed | Usually worth doing | When to escalate |
|---|---|---|
| Fan rubs frost / hum changes with door | Controlled defrost + airflow/vent check | If it returns quickly or cooling worsens |
| Rear-bottom hum + dust/obstruction | Unplug → gentle cleaning + clearance/leveling | If outlet/cord heats or hum pairs with clicking |
| Hard clicking + repeated failed starts | Stop cycling tests | Service recommended (safety + risk) |
Serious cases (stop and call service)
Stop troubleshooting if cooling is failing quickly, the cord/outlet is hot, you smell burning, the unit repeatedly clicks and fails to start, or you see water near electrical areas. Safety beats “one more test.”
FAQ
Is a humming freezer always a bad sign?
Not always. Humming can be normal during compressor and fan operation. Red flags include sudden loudness, pitch changes, constant humming, or rising temperatures.
Why does the noise change when I open the door?
Many units change fan behavior when the door opens. That’s why the door-switch test helps identify fan-side noise.
What does “fan hitting ice” usually sound like?
Often a louder hum with a rubbing edge, sometimes a rhythmic “shh-shh” or light grinding that comes and goes. If it disappears after controlled defrost and returns, suspect a recurring frost/airflow pattern.
Should I set the freezer colder to reduce humming?
Usually no. Over-cooling can increase run time. A common target is 0°F / −18°C. If you can’t hold that steadily, focus on airflow, seals, frost patterns, and rear cleaning.
Can leveling and wall clearance really change the hum?
Yes. Tight wall contact or slight unleveling can amplify normal vibration. If the hum drops when you pull the unit away from the wall, clearance/leveling deserves attention.
When should I stop DIY?
Stop if you smell burning, the outlet/cord is hot, you hear repeated hard clicking failures, cooling is failing fast, or you feel tempted to chip ice with sharp tools.
Internal Links
- https://homefixatlas.com/freezer-frost-build-up/ — Frost patterns that block vents and trigger fan rubbing noises.
- https://homefixatlas.com/freezer-not-freezing-enough/ — If humming comes with warming temps, follow this cooling restore path.
- https://homefixatlas.com/refrigerator-making-clicking-or-buzzing-noises/ — Clicking/buzzing decoding when noise overlaps with start/overload symptoms.
Sources
- FDA — Safe cold storage temperatures (0°F / −18°C)
- FoodSafety.gov — Refrigerator & freezer temperature guidance
- Whirlpool — Normal vs abnormal fridge/freezer noises (fans & compressor)
Safety notice
This article is informational and prioritizes low-risk isolation tests first. Accessing internal fans, electrical parts, or sealed components can be hazardous. If you suspect electrical overheating, repeated failed starts, or fast temperature rise, stop and contact a qualified professional.
Update log: 2026-01-29 — Unified 60-second checklist, improved isolation logic, expanded matrices, and strengthened stop signals.

I publish step-by-step troubleshooting guides for common home appliance issues (washer, dryer, refrigerator, HVAC basics).
Content is written for everyday homeowners and cross-checked with manufacturer manuals, safety guidance, and trusted public resources.
Posts include practical checks, clear stop-signs for safety, and guidance on when it’s better to call a qualified technician. Updates are logged whenever steps or recommendations change.
Safety note: If you smell gas, see burning, or suspect electrical hazards—stop immediately and contact a qualified professional.