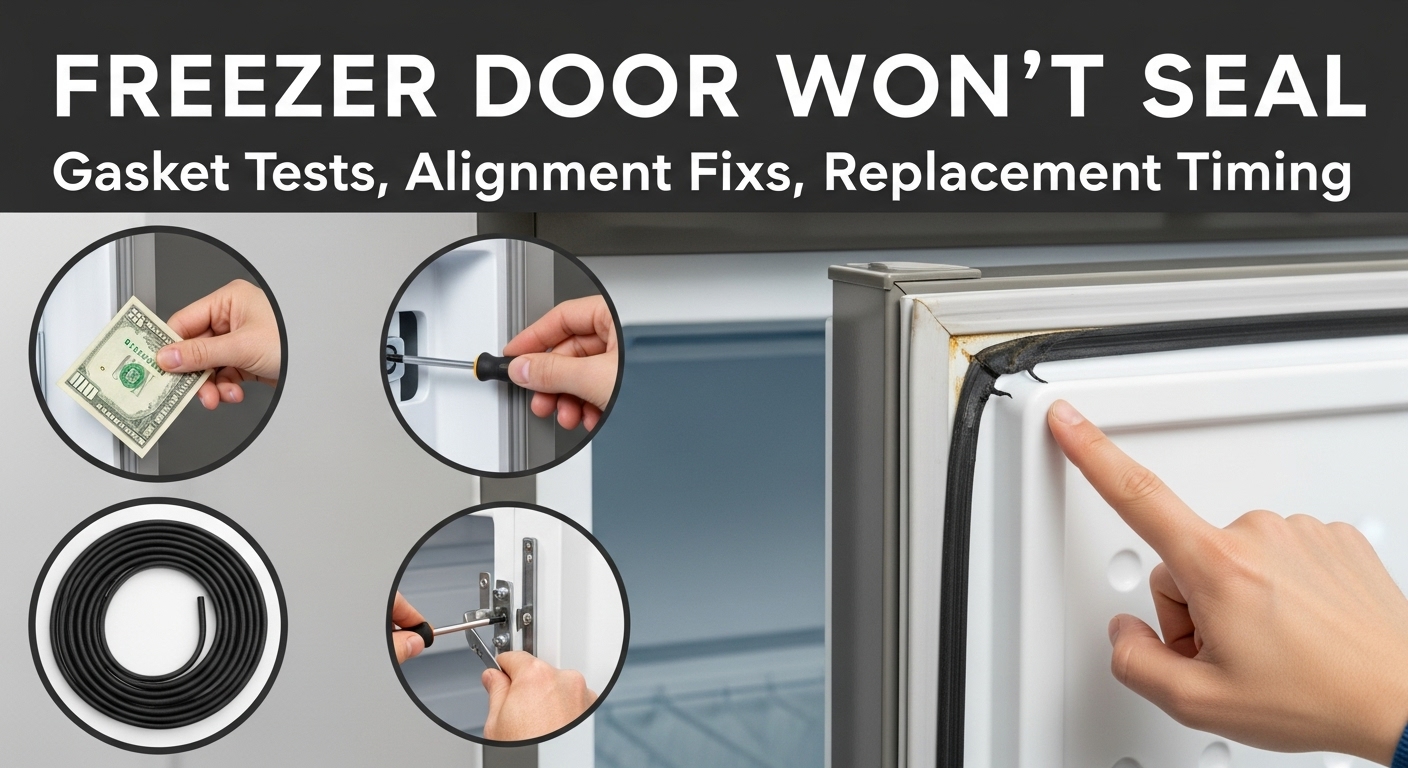
Freezer door won’t seal? Start with the paper test — then confirm with a light-leak test and a cold-draft feel test.
Most seal problems fall into three buckets: (1) dirty or sticky gasket folds, (2) door not sitting square (alignment/leveling/obstructions), (3) gasket that’s warped, torn, or hardened. This one-page flow fixes the easy wins first, then tells you exactly when replacement makes sense.
Key number #1 Food safety targets: Freezer ~0°F (-18°C), Fridge ≤ 40°F (4°C).
Why 40°F matters: 40–140°F is the “Danger Zone” where bacteria can multiply fast.
Key number #2 A healthy gasket should “grip” paper with noticeable resistance along the entire perimeter—not just one corner.
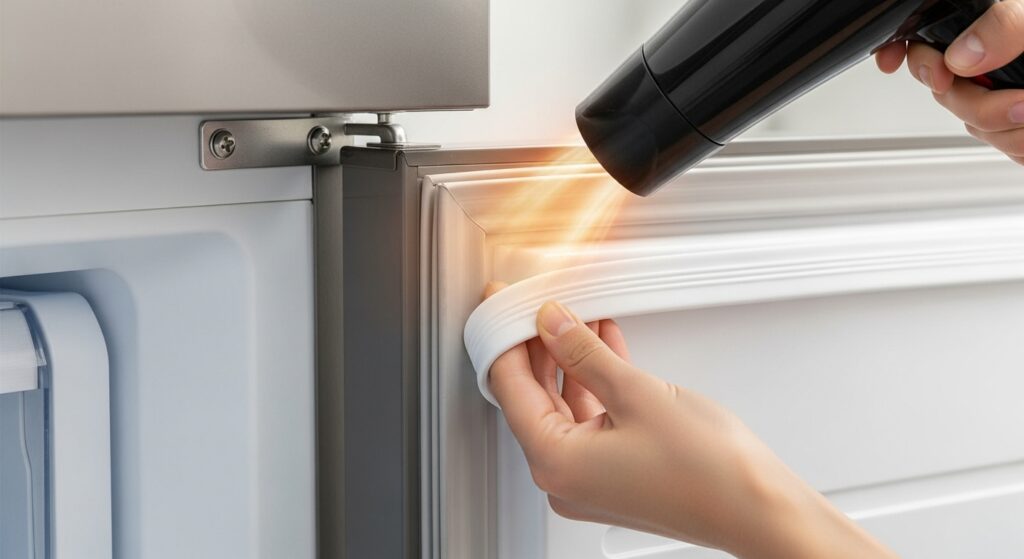
Key number #3 A warped gasket often re-forms with gentle heat: low heat, 10–15cm away, moving for 30–60 seconds can help it sit flat.
Why this one-page guide exists
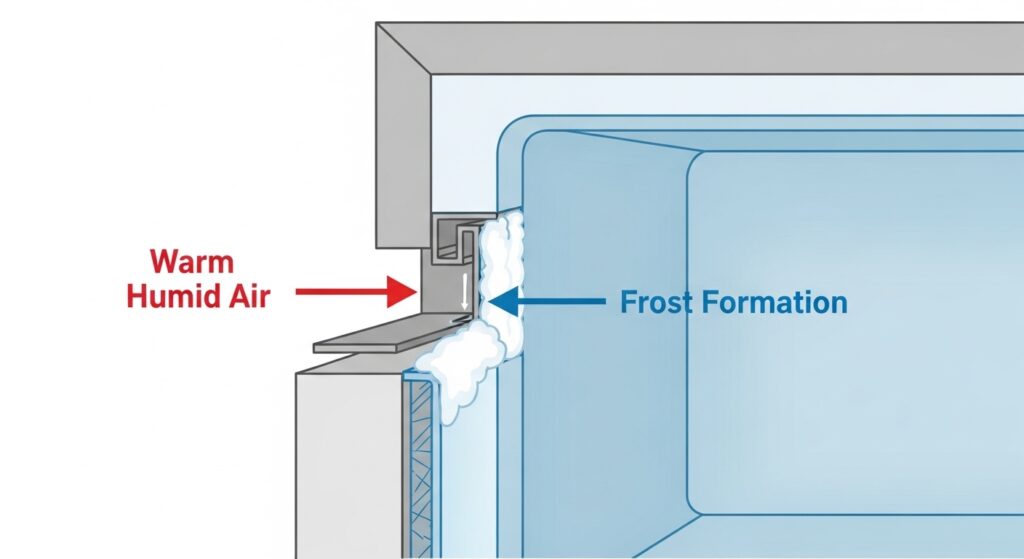
- A weak seal lets humid air enter → moisture freezes → frost grows near the door edge → longer run time.
- Many “bad gaskets” are actually sticky residue, ice ridges, or overpacked drawers preventing a full close.
- Fixing the seal first prevents expensive guesswork (fans, boards, sealed-system assumptions).
⚠️ Safety first (before you adjust hinges or move the unit)
- Unplug before moving the appliance or loosening hinge bolts. Doors are heavy and can pinch.
- Don’t use knives or screwdrivers to scrape ice near the gasket. One cut can turn into a permanent leak.
- Stop and get help if the door is sagging severely, the hinge looks cracked, or the cabinet frame is bent.
Updated: 2026-02-01 • One-page plan: test → clean & dry → remove blockers → alignment/level → reshape → replace if needed
Notes: Built from manufacturer guidance + standard service practice. (No guessy “swap parts and pray” approach.)
A freezer can feel “cold” and still leak warm air. The giveaway is usually frost that keeps returning on the door edge, a door that needs an extra shove, or packages that get snowy fast. People often blame the compressor—but a weak seal can create the exact same “it’s not holding temp” stress. If you map the leak first, everything else becomes simpler.
How a tiny gasket leak turns into frost (plain-English)
Room air carries moisture. When it slips past a weak gasket, that moisture hits cold surfaces and freezes. The freezer works harder to recover, which can make temperatures swing and frost build faster. In simple terms: leak → moisture → frost → longer run time.
| What’s happening | What you’ll notice | Why it matters |
|---|---|---|
| Warm air sneaks in | Frost line near the door edge | More run time, more defrost stress |
| Moisture freezes on contact | Snowy packages, ice beads on the frame | Ice can hold the door slightly open (seal gets worse) |
| Temperature swings | Soft ice cream, inconsistent freezing | Food quality + safety risk if temps rise toward the Danger Zone |
Priority fix protocol (fastest wins first)
- Step 1 — Test it three ways (paper → light → cold-draft):
Paper test (leak map): close the door on a strip of paper and pull gently. Repeat every 6–8 inches around the gasket. Mark weak zones.
Light-leak test: in a dark room, place a bright flashlight inside the freezer and close the door—look for light escaping around the edge.
Cold-air feel test: run the back of your hand along the perimeter; a steady cold draft often matches the weak zones.
Note: paper is great, but micro-leaks can slip past a single test—stacking tests increases accuracy. - Step 2 — Clean + fully dry (sticky folds don’t seal):
Use mild dish soap + warm water, and a soft toothbrush for folds/corners. Wipe the cabinet contact surface too.
Rinse (damp cloth) and dry with a soft towel. A slightly greasy gasket can “slide” instead of compressing evenly.
Re-run the paper test on the same marked weak zones after everything is dry. - Step 3 — Remove hidden “closure blockers” (the door might be fine):
Check drawers not seated, overfilled bins, bags sticking out, or an ice ridge on the frame. These can make a freezer door not sealing feel like a gasket failure.
Close the door gently and re-test the same zones. If the door needs a shove, it’s usually fighting something.
- Step 4 — Fix “door pops open” and alignment/leveling issues:
If the freezer door pops open after you close it, suspect leveling or an obstruction first (not the gasket). A slight backward tilt helps many doors self-close.
Check the door gap: is one corner tighter than the others? Does the door “drop” slightly when you release it? If hinges are adjustable and you’re confident, make tiny changes—then re-test with paper/light. - Step 5 — Re-shape the gasket safely (reduce failure rate):
For curled corners or waves, use a hair dryer on low. Hold it 10–15cm (4–6 in) away, keep it moving, and warm the area for 30–60 seconds (do not blast one spot).
Press the gasket flat where it leaks and hold it in the correct position for 30–60 seconds, then let it cool in shape.
If you see tears, cracks, missing sections, or hardened rubber, reshaping usually won’t hold—move to replacement.
Pro tip (short-term seal boost—use with restraint)
A very thin film of food-safe petroleum jelly on the gasket face can improve contact briefly after cleaning. Do not overapply—too much can attract dust and make the gasket grimy faster. If the paper test improves immediately, that’s strong evidence the seal is the real problem (not a cooling-system failure).
If replacement is needed: a practical DIY mini-guide
- Find your model number (inside the door frame or side wall), then order an OEM gasket matched to that model.
- Before installing, soak the new gasket in lukewarm water for ~10 minutes to relax shipping folds.
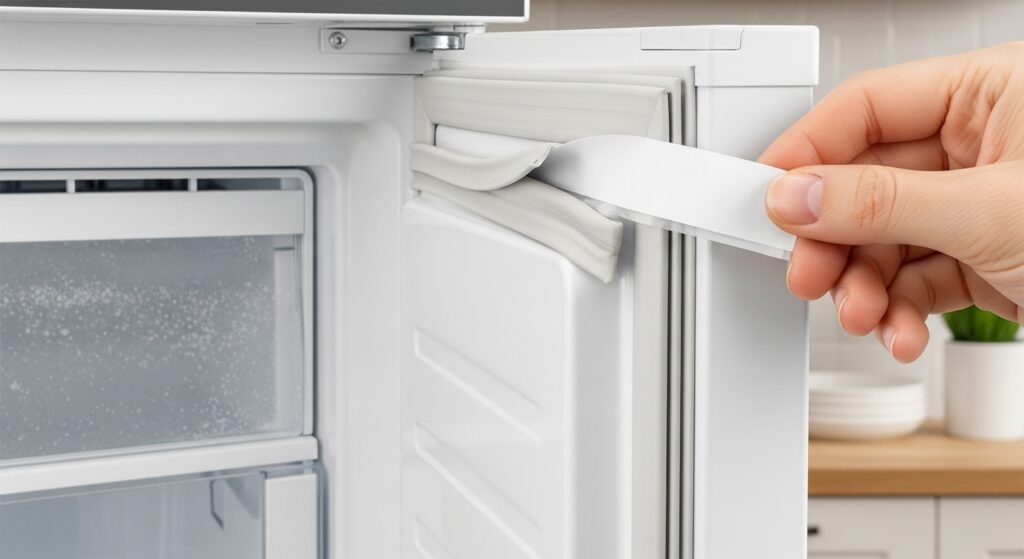
- Remove the old gasket carefully (many styles pull out of a channel or sit under a retainer). Start at a corner.
- Install the new gasket corner-first, working evenly around the perimeter. Avoid stretching one side tight.
- Close the door and re-run paper + light tests. If it still leaks badly or the door sits crooked, hinge/alignment may be the real issue.
Balance note: if the gasket style is unclear, the door feels heavy/saggy, or the cabinet frame looks off, service is often cheaper than “DIY + wrong part + repeat.”
Diagnostic matrix (freezer door won’t seal symptoms → cause → best move)
| What you notice | Most likely cause | Best first move | What “success” looks like |
|---|---|---|---|
| Frost on door edge keeps returning | Localized gasket leak | Paper + light test → clean/dry → reshape that exact spot | Paper grips; light leak disappears; frost slows within 24–48 hours |
| Freezer door pops open | Obstruction or leveling issue | Clear blockers → slight back tilt → re-test perimeter | Door self-closes; no bounce-back |
| Visible corner gap | Warped gasket or hinge sag | Warm & reshape → check alignment | Gap shrinks; paper resistance increases |
| Gasket looks torn or cracked | Material failure | Replace gasket (OEM by model #) | Even seal restored after install + retest |
| Door sagging or hinge damage | Mechanical risk | Stop DIY, get service | Door sits square without forcing |
Timing plan (today vs this week)
| Time window | Do this | Why it matters |
|---|---|---|
| 0–15 minutes | Paper + light test + draft feel; mark weak zones | Turns “guessing” into a targeted fix map |
| 15–40 minutes | Clean & dry gasket + frame; remove blockers | Fixes many seal problems without buying parts |
| This week | Reshape gasket; adjust leveling/alignment if needed | Restores even pressure so the seal holds long-term |
Common mistakes (and why they backfire)
- Replacing the gasket before mapping leaks. The real cause might be leveling, hinge sag, or an obstruction.
- Scraping ice with sharp tools. One cut creates a permanent leak channel.
- Using high heat in one spot. Overheating can deform rubber and make sealing worse.
- Overapplying petroleum jelly. Too much attracts dust and can reduce long-term seal quality.
- Ignoring “door pops open.” Many “freezer door not sealing” cases are actually leveling/closure physics.
If your freezer door won’t seal but the gasket looks “fine,” treat it like a contact-pressure problem first: cleanliness, obstructions, leveling, then gasket shape.
Serious cases (stop and get help)
Stop DIY if the door is sagging heavily, hinges are cracked, the cabinet frame is bent, or you can’t maintain safe temperatures after seal fixes. Food safety matters more than “making it work.”
If you call service, prepare this (faster diagnosis):
- Model number + serial (photo helps)
- Your leak map (where paper slips / where light leaks)
- Thermometer readings: freezer & fridge temps (with time)
- Whether the door pops open / needs a shove / shows a visible corner gap
FAQ
How do I know if it’s the gasket or hinge alignment?
Use the tests as a pattern detector. If weak spots cluster at one corner and the door gap looks uneven, alignment/sag is likely involved. If weak spots are scattered, cleaning or gasket condition is more likely. Light leaks are especially telling for corner alignment.
Freezer door pops open after I close it — is that a gasket problem?
Often it’s leveling or an obstruction. Clear blockers first, then set a slight backward tilt so the door naturally self-closes. If it still pops open, check for hinge sag or a warped gasket corner.
Frost on door edge keeps returning — what does that usually mean?
That’s a classic gasket leak signature: moist room air is entering at that edge. Map the leak with paper + light test, fix the seal, then defrost and re-check after 24–48 hours.
Is it okay to use a hair dryer on a freezer gasket?
Yes, if you do it gently: low heat, 10–15cm away, keep it moving, and limit to 30–60 seconds. The goal is “warm and flexible,” not “hot and soft.”
Can a dirty gasket really cause temperature problems?
Absolutely. Sticky residue and crumbs prevent full contact and create tiny leak channels. Over time, those channels add moisture, build frost, and force longer run cycles.
Should I replace the gasket if it looks “a little” cracked?
Superficial scuffs aren’t the same as structural cracks. If cracks open when you flex the gasket, or there are tears/missing sections/hard rubber, replacement is the safer long-term move—especially if paper + light tests stay weak after cleaning and reshaping.
What should I do after I fix the seal?
Defrost heavy ice, wipe dry, and verify temperatures with an appliance thermometer. Aim for 0°F in the freezer. If temperatures still won’t stabilize, move to cooling diagnostics (coils, airflow, defrost system).
Internal Links
- https://homefixatlas.com/freezer-frost-build-up/ — Frost causes checklist (door leaks, defrost cycle, airflow patterns).
- https://homefixatlas.com/freezer-not-freezing-enough/ — If temps stay high after seal fixes, use this cooling diagnosis path.
- https://homefixatlas.com/refrigerator-runs-constantly/ — Why run time increases (coils, airflow, and door-seal impact).
References
- USDA FSIS: Refrigeration and food safety (safe temperature guidance)
- Whirlpool: Freezer troubleshooting (paper test / door seal basics)
- Whirlpool Owner’s Manual (clean gaskets with mild soap + warm water; dry thoroughly)
Safety notice
This article is informational and prioritizes low-risk checks first. Hinge adjustments and appliance movement can be hazardous. If you can’t maintain safe temperatures, or the door/hinges/frame appear damaged, stop and contact qualified service.
Update log: 2026-02-01

I publish step-by-step troubleshooting guides for common home appliance issues (washer, dryer, refrigerator, HVAC basics).
Content is written for everyday homeowners and cross-checked with manufacturer manuals, safety guidance, and trusted public resources.
Posts include practical checks, clear stop-signs for safety, and guidance on when it’s better to call a qualified technician. Updates are logged whenever steps or recommendations change.
Safety note: If you smell gas, see burning, or suspect electrical hazards—stop immediately and contact a qualified professional.